
F10 Treadmill FAQ
F10 Treadmill Product Photo
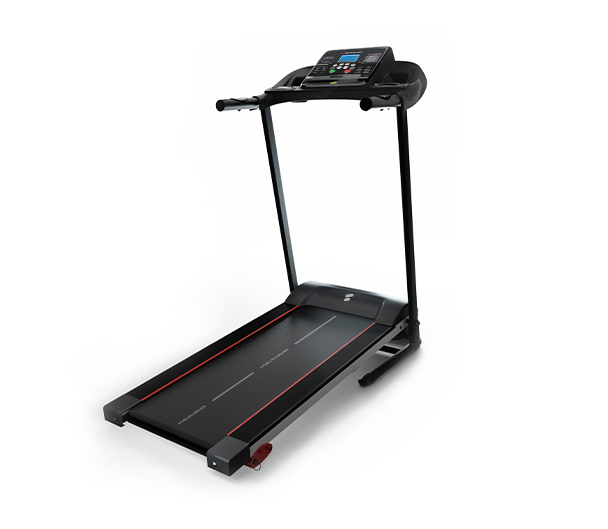
F10 Treadmill Assembly Video
FAQ
Here you’ll find answers to your questions about the F10 treadmill.
What is the distance between the running surface and the floor, to check whether the ceiling height is sufficient?
The distance between the top of the running surface and the floor is 15 cm.
Is the F10 treadmill compatible with the Sportstech Live app?
Yes. The F10 treadmill is compatible with the Sportstech Live app.
What type of footwear is suitable for the treadmill?
It is important to note that treadmills should be used with sneakers that have a smooth, flat sole. Trail shoes or shoes with studs or coarse soles can cause excessive wear and tear, which may damage the device.
What is the size of the running surface on the F10 treadmill?
The running surface measures 101 x 34,5 cm.
How much power does the F10 treadmill consume?
Exact power consumption depends on how the treadmill is used, but is typical for a treadmill in this class.
Can the F10 treadmill also be used outdoors?
No, the treadmill is designed for indoor use only.
How large should a floor protection mat for the F10 treadmill be?
The floor protection mat should measure at least 120 x 60 cm.
What is the maximum user weight for the F10?
The maximum user weight is 150 kg.
Does the F10 have an adjustable incline?
Yes, in addition to the standard setting, the F10 has 3 additional manually adjustable incline levels.
What is a demonstration unit?
Demonstration units are a cost-effective option for high-quality products, offered at a reduced price. These used products have either been tested by prospective customers or displayed in stores. Demonstration products have minor signs of use, but are carefully checked for technical and visual condition.
Is the F10 treadmill compatible with a heart rate monitor | chest strap?
Yes, the F10 is compatible with the "Sportstech sPulse" and all other Bluetooth chest straps.
Does the F10 treadmill have an emergency stop function?
Yes, the F10 has an emergency stop function.
Troubleshooting & Quick Fixes
Console is too wide/doesn’t fit
You need to insert one side bar into the console. You need to flex the second bar slightly so that it also fits into the console; this is normal. When correctly positioned, the side bars should look like the letter "V" when you stand in front of the treadmill.
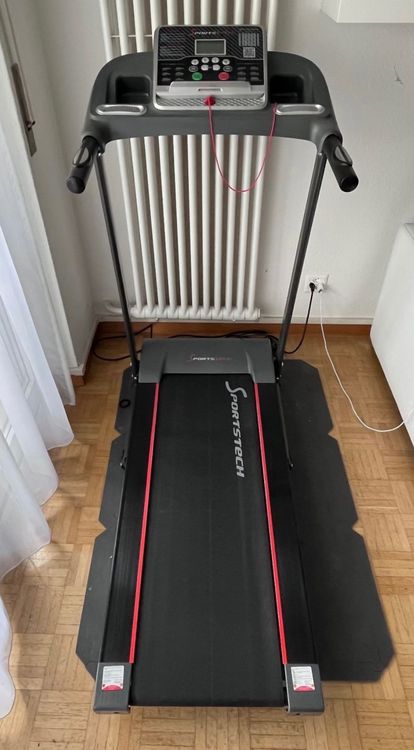
Error SAFE – Safety key
⚠️ Error SAFE – Safety key
Description:
The safety key is not in place or the magnet is too weak. Your treadmill will not start unless the key is correctly in place.
Solution:
Check that the safety key is correctly inserted in its designated slot.
Check the magnetic force – if the magnet is weak, you can test it using another magnet.
If this does not help, you will need a replacement safety key.
👉 The replacement can easily be carried out at home – without voiding your warranty and much more conveniently than returning the treadmill. If this does not resolve the issue, we will be happy to collect your device under warranty. Don’t worry: if anything does not go as planned during replacement and the device is damaged as a result, we will of course take responsibility – provided you have handled the device carefully and respectfully.
Applies to: all models with a safety key
Error 1 – Cable connection
⚠️ Error 1 – Cable connection
Description:
The cable connection between the display, console or PCB in the motor area may be loose, disconnected or faulty.
Solution:
Disconnect the device from the power supply.
Open the motor cover.
Check all plug connections: are they secure, and are any cables broken?
Reassemble the device and test it.
👉 If the problem persists, a replacement circuit board is probably needed.
➡️ The replacement can easily be carried out at home – without voiding your warranty and much more conveniently than returning the treadmill. If this does not resolve the issue, we will be happy to collect your device under warranty. Don’t worry: if anything does not go as planned during replacement and the device is damaged as a result, we will of course take responsibility – provided you have handled the device carefully and respectfully.
Error 2 – Motor or control board
⚠️ Error 2 – Motor or control board
Description:
The motor or control board needs to be replaced.
Solution:
👉 Order the motor or control board directly via the chatbot.
➡️ The replacement can easily be carried out at home – without voiding your warranty and much more conveniently than returning the treadmill. If this does not resolve the issue, we will be happy to collect your device under warranty. Don’t worry: if anything does not go as planned during replacement and the device is damaged as a result, we will of course take responsibility – provided you have handled the device carefully and respectfully.
Error 4 – Voltage problem
⚠️ Error 4 – Voltage problem
Description:
The device is not receiving enough power, or the control board is faulty.
Solution:
Disconnect the device from the power supply and wait a few minutes.
Open the motor cover and check the plug connections.
Connect directly to a wall outlet (do not use an extension cord).
As a test, switch off other power-intensive devices.
If there is no improvement → replace the control board.
👉 You can order spare parts directly via the chatbot.
➡️ The replacement can easily be carried out at home – without voiding your warranty and much more conveniently than returning the treadmill. If this does not resolve the issue, we will be happy to collect your device under warranty. Don’t worry: if anything does not go as planned during replacement and the device is damaged as a result, we will of course take responsibility – provided you have handled the device carefully and respectfully.
Error 5 – Control board / motor
⚠️ Error 5 – Control board / motor
Description:
In most cases, the control board needs to be replaced. If this does not help, the motor is faulty.
Solution:
👉 Order spare parts directly via the chatbot.
➡️ The replacement can easily be carried out at home – without voiding your warranty and much more conveniently than returning the treadmill. If this does not resolve the issue, we will be happy to collect your device under warranty. Don’t worry: if anything does not go as planned during replacement and the device is damaged as a result, we will of course take responsibility – provided you have handled the device carefully and respectfully.
Error 7 – Motor overvoltage
⚠️ Error 7 – Motor overvoltage
Description:
This is often caused by the running belt being too tight.
Solution:
Loosen the running belt (according to the manual).
If necessary, tighten it slightly, but not as much as before.
If the problem persists → replace the motor.
👉 You can order spare parts directly via the chatbot.
➡️ The replacement can easily be carried out at home – without voiding your warranty and much more conveniently than returning the treadmill. If this does not resolve the issue, we will be happy to collect your device under warranty. Don’t worry: if anything does not go as planned during replacement and the device is damaged as a result, we will of course take responsibility – provided you have handled the device carefully and respectfully.
Error 8 – Faulty drive motor
⚠️ Error 8 – Faulty drive motor
Description:
The drive motor is probably faulty.
Solution:
👉 Order the replacement motor directly via the chatbot.
➡️ The replacement can easily be carried out at home – without voiding your warranty and much more conveniently than returning the treadmill. If this does not resolve the issue, we will be happy to collect your device under warranty. Don’t worry: if anything does not go as planned during replacement and the device is damaged as a result, we will of course take responsibility – provided you have handled the device carefully and respectfully.
Three dashes on the display
If the screen only shows three dashes after you switch on your treadmill, this means that the safety clip has not been attached. This is a safety feature. You must attach the safety magnet to the console before you can start your workout.
Running belt shifts while running
Follow these instructions to tension your treadmill correctly:
1. Choose the right tool - Depending on the model, you will need either a Phillips screwdriver or an Allen key. One of these tools is usually included with the treadmill.
2. Adjust the tension - If the treadmill belt slips, increase the tension by turning the right and left adjustment screws a quarter turn clockwise. If the belt is blocked, reduce the tension by turning both screws a quarter turn counterclockwise.
3. Check the adjustment, now set a speed of 1-2 km/h and walk on the treadmill. If the belt slips (the motor spins without moving the belt), increase the tension. If the belt and motor are blocked, reduce the tension. Also make sure the belt runs down the center. If it doesn’t, center it correctly.
4. If the running belt is not centered, increase the tension on the side toward which it is moving. (If it moves to the right = slightly tighten the right side or slightly loosen the left; if it moves to the left = slightly tighten the left side or slightly loosen the right) tighten by a maximum of a quarter turn at a time, then check again that the belt is centered.
Maintenance & cleaning
At least once a year, remove the treadmill’s motor cover and use a vacuum cleaner to remove any dust or dirt to ensure that the motor and drive system continue to function smoothly.
Cleaning: After each use, wipe sweat off the device with a slightly damp cloth. Avoid getting any moisture or water on the electrical or electronic components. Do not use abrasive cleaners or solvents.
Maintenance: Check the condition of the device before and after every workout. Make sure all fasteners and protective covers are securely in place; tighten screws and nuts if necessary. Before every workout, check that the safety clip is working correctly: stand on the side rails of the treadmill. Start the treadmill at a low speed. Pull the safety clip to stop the treadmill immediately. The treadmill should not restart while the safety clip is detached.
Lubrication: The running belt must be adequately lubricated with silicone oil to ensure the device functions properly and has a long service life. The lubrication system is located underneath the device. Lubrication and inspection intervals: Add silicone oil after the first 25 hours of operation or every 2-3 months. Check the lubrication regularly. Add silicone oil no later than every 50 hours of operation or every 5-8 months. Check the lubrication: Unplug the device. Lift the running belt on one side. Run your finger along the top of the running deck underneath the running belt: if the running deck feels slightly oily, lubrication is sufficient. If the running deck is dry, add silicone oil.
Display: ERR01 – What should I do?
In this case, a bent pin in the plug connection may be causing this error message. To resolve the issue, we recommend carefully straightening the bent pin. Please be extremely careful to avoid damaging the plug connection. (See images) 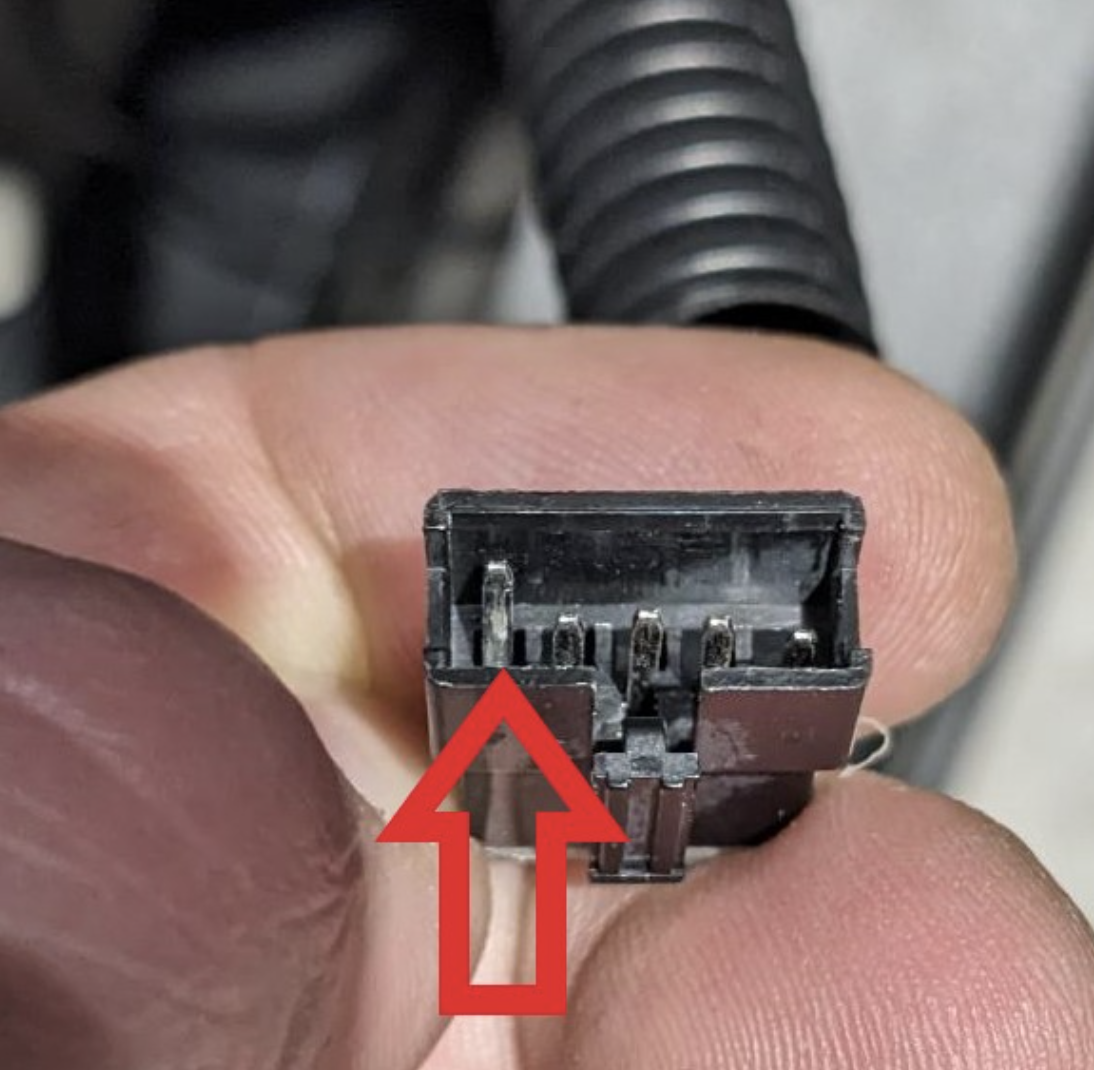
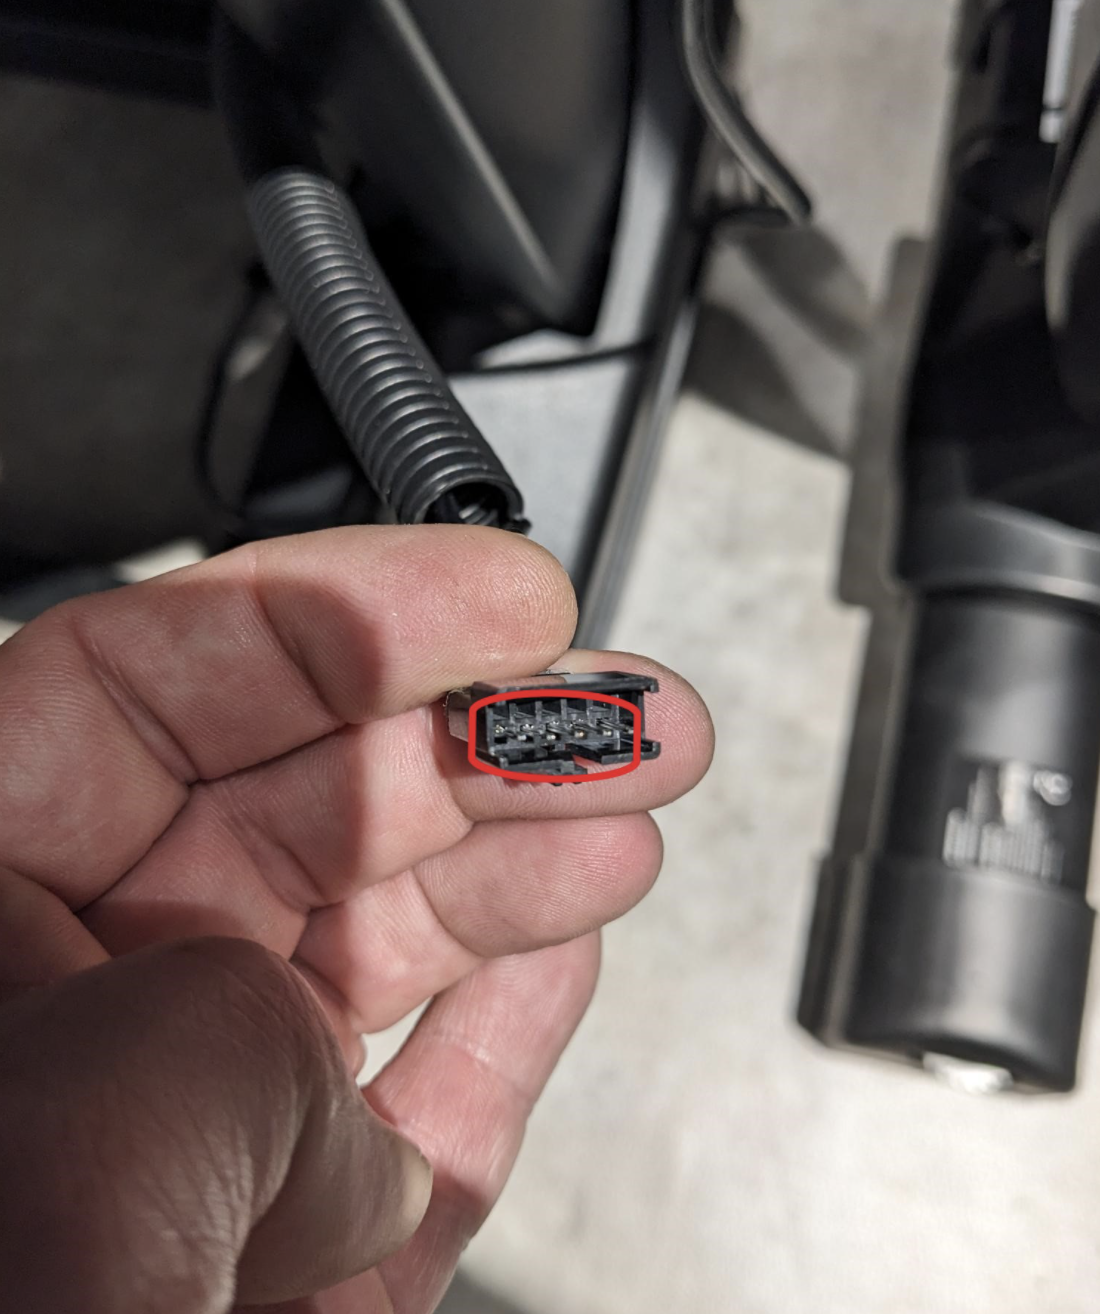
The console is wider than the running surface.
The console, i.e. the upper section, is intentionally 12 cm wider than the running surface. To install the console, first slightly loosen the screws on the lower side bars. Then, by gently pushing the side bars outward, you can fit the console under slight tension. It is important to tighten all screws only once the console is securely in place. We have prepared a video guide to show you this step in detail. You can access the video only via the link provided here.
Click here for the video:
My treadmill won’t turn on – what should I do?
You may often be able to resolve the problem yourself without affecting your warranty.
Follow these simple steps to check for possible causes and resolve the issue:
- Switch off the treadmill and disconnect it from the power supply. This is important to make sure there is no electrical connection while you inspect the device.
- Carefully open the motor cover. It is usually located at the bottom of the treadmill and may be secured with screws or snap fasteners, depending on the model.
- Check that all cable connections are secure, especially those between the motor and the control unit. Loose or damaged cable connections can sometimes prevent the treadmill from starting.
- If necessary, reconnect any loose connections securely. Make sure the connections are firmly in place to ensure the treadmill works properly.
- Close the motor cover and reconnect the treadmill to the power supply. Once you have completed the inspection, close the cover and test the treadmill by reconnecting it to the power supply.
If your treadmill still does not work after following these steps, I recommend contacting our customer support team for further assistance. Our team will be happy to help you resolve the issue so you can get back to your workout as soon as possible.
F10 Repair Guides
Instructions for replacing the motor on the F10 treadmill
Tools required:
- Phillips screwdriver
- 2x 14mm open-end wrenches
Preparation:
Switch off the treadmill and disconnect it from the power supply.
Steps:
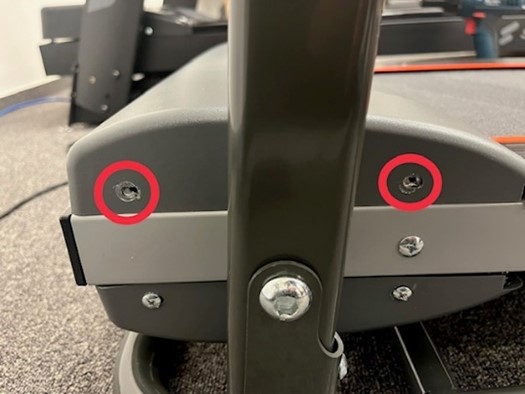
1. Remove the motor cover:
Unscrew the side screws and remove the cover.
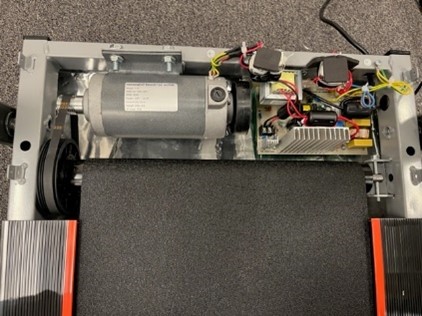
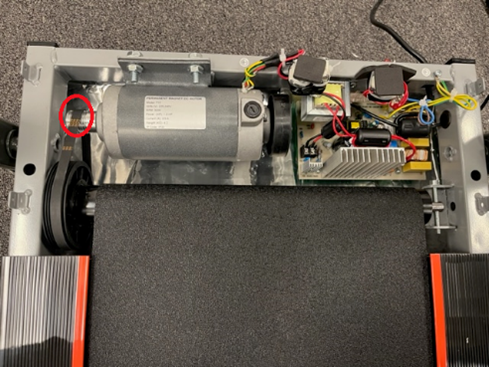
2. Access the motor compartment:
Once the cover is removed, the motor compartment and PCB are visible. Caution: The capacitor on the PCB may still be charged.
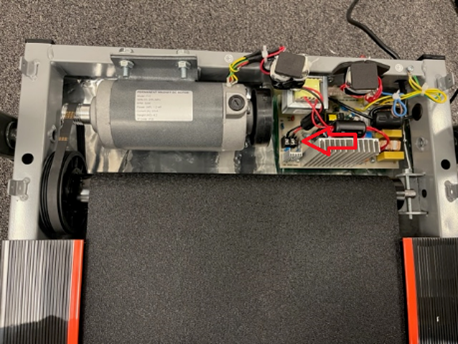
3. Disconnect the motor wires:
Disconnect the motor wires from the PCB; only loosen the screws.
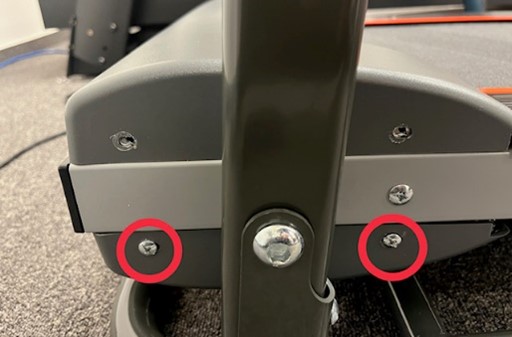
4. Remove the lower motor cover:
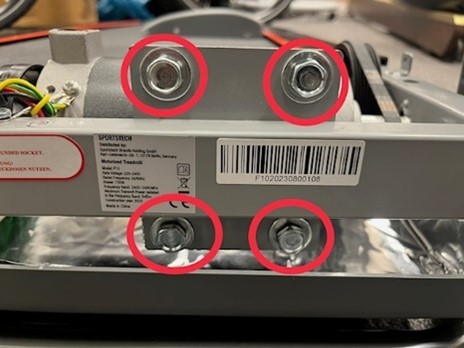
Loosen the four screws on the sides. Left and right.
5. Loosen the nuts on the frame:
Loosen the four nuts on the outside of the frame.
6. Replace the motor:
Remove the old motor and insert the new one. Do not remove the screws.
7. Secure the motor:
Place the belt on the motor and tighten the nuts.
8. Connect the motor wires:
Make sure the polarity is correct. Tip: If the motor does not work, check the polarity. (Positive and negative)
9. Secure the motor cover:
Screw the upper and lower covers back into place.
Instructions for replacing the control board (PCB)
Instructions for replacing the control board
Tools required:
- Phillips screwdriver
- Camera or smartphone (optional, for taking photos before removal)
Steps:
1. Disconnect the treadmill from the power supply:
Disconnect the treadmill from the power supply 5 minutes before starting work.
2. Remove the top cover:
Use a Phillips screwdriver to remove the two side screws from the top cover and lift it off. Take photos of the control board before removing it to make reinstallation easier.
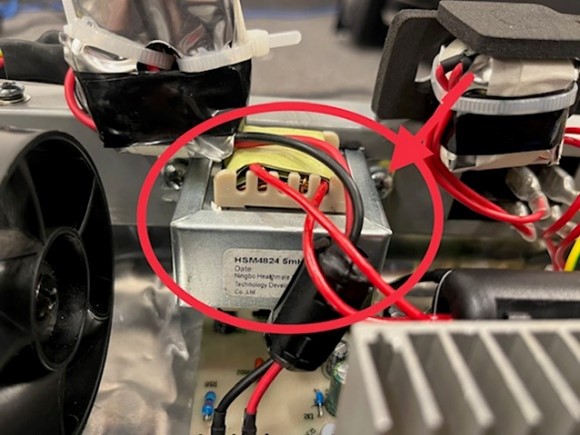
3. Disconnect the electrical connections:
The control board is located in the middle. Carefully disconnect all electrical connections.
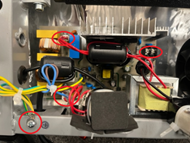
4. Remove the screws from the control board:
There are four screws on the control board. Remove them with the Phillips screwdriver.
5. Remove the control board:
Once you have removed the screws, you can take out the control board.
6. Install the new control board:
Secure the new control board in the designated locations and reconnect all electrical connections.
7. Reattach the cover:
Reattach the top cover using the screws you removed earlier.
Your control board has been successfully replaced. Make sure all connections have been properly reconnected before using your device again.
Instructions for replacing the running deck
Instructions for replacing the treadmill running deck
Tools required:
- Phillips screwdriver
- Sturdy scraper or putty knife
- 10mm open-end wrench
Steps:
1. Remove the motor cover:
Remove the motor cover by loosening the five screws.
2. Remove the rear corner covers:
Remove the corner covers by loosening the two screws in each rear corner.
3. Remove the side foot rails:
The side foot rails are glued in place. Use the scraper or putty knife to carefully pry them off. Remove any adhesive residue with the putty knife.
4. Loosen the running belt:
Turn both adjustment screws 3-4 turns to the left to loosen the running belt.
5. Remove the screws from the deck:
Unscrew the screws from the running deck. Note that the screws at the end of the treadmill are secured by nuts underneath.
6. Loosen the oil reservoir:
Remove the two screws from the oil reservoir and pull the reservoir outwards.
7. Remove the damaged running deck:
Pull the damaged running deck sideways out from between the frame and the running belt.
8. Install the new running deck:
Slide the new running deck into position between the frame and the running belt. Insert all the screws and then tighten them.
9. Screw the oil reservoir back in:
Reinstall the two screws on the oil reservoir.
10. Secure the foot rails:
Apply new double-sided tape to the foot rails.
11. Turn the adjustment screws back:
Turn the adjustment screws back the same number of turns to tension the treadmill belt again.
12. Install the motor cover and corner covers:
Reattach the motor cover and secure it with the five screws. Install the rear corner covers using the two screws on each side.
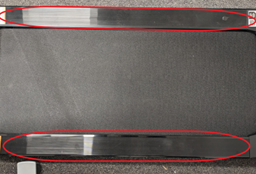
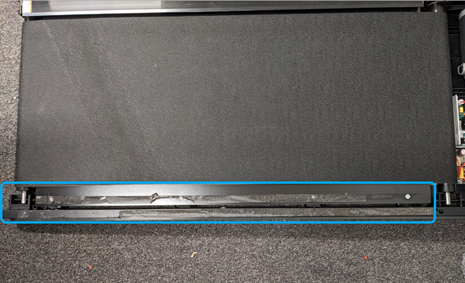
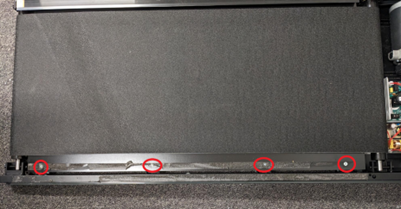
Your running deck should now have been successfully replaced, and your treadmill is ready to use again.
Error message E01 - Communication error between control panel and PCB
Troubleshooting the control panel
Steps:
1. Check the control panel:
Check the control panel for irregularities, such as damaged display elements or buttons. Make sure there is no visible damage.
2. Check the connection:
Check the connection between the control panel and the main board (PCB). Make sure the cables are securely and correctly connected. If necessary, disconnect and reconnect them to make sure they are properly seated.
3. Inspect the connecting cables:
Inspect the connecting cables between the control panel and the PCB for wear or damage. Replace any worn or defective cables.
4. Consider replacing the main board:
If the previous steps do not resolve the issue, consider replacing the entire main board (PCB) in case an internal fault is interfering with communication.
After following these steps, the problem should be resolved and communication between the control panel and the PCB restored.
How do I pack the treadmill?
Packing instructions for the Sportstech F10 treadmill
Materials required:
- Bubble wrap or foam padding
- Cardboard box or moving boxes
- Packing tape
- Knife or scissors
- Packing material such as Styrofoam or newspaper (optional)
Steps:
1. Switch off the treadmill and disconnect it from the power supply:
Make sure the treadmill is switched off and unplug it to disconnect it from the power supply.
2. Secure the running surface and handles:
Make sure the running surface is locked in a horizontal position and the handles or armrests are stable.
3. Remove loose parts:
Remove any loose or detachable parts from the treadmill, such as safety clips, cables or accessories.
4. Clean the treadmill:
Remove dust and dirt from the surface of the treadmill and all other parts.
5. Add padding (optional):
Use bubble wrap, foam padding or packing material to protect sensitive parts such as the control panel, display or motor.
6. Pack the treadmill:
Place the treadmill on a sufficiently large piece of cardboard or in a moving box. Make sure it is stable.
7. Secure the treadmill:
Place additional packing materials around the treadmill to protect it from impact. Make sure it is secure inside the packaging.
8. Seal the box:
Fold the box over the treadmill and secure it with packing tape. Make sure the box is firmly sealed.
9. Label the box:
Attach the return label to the box.
10. Store or transport the treadmill:
Store or transport the packed treadmill to a safe location as needed.
The spare parts list includes all the individual components installed, from assembly through to use.
The manual contains all the important information.