
F37s Treadmill FAQ
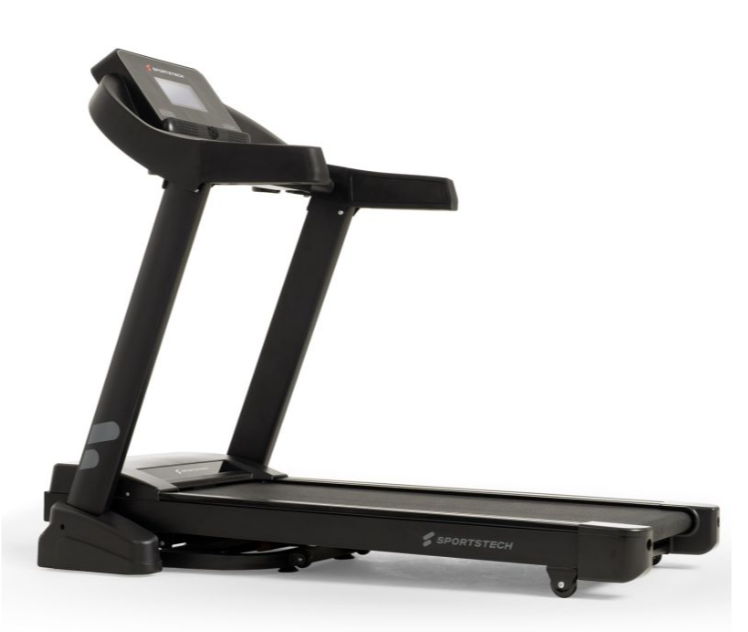
F37s product photo
F37s assembly video
FAQ
Which oil should be used to lubricate the running belt?
Use only silicone oil or spray to lubricate the running belt. You can find further information here.
Are distances indicated in kilometers or miles?
The distance on the treadmill is indicated in kilometers.
When do I need to lubricate the running belt?
With frequent use (3–5 times a week): Apply 2–3 drops every 2–3 weeks.
With less frequent use (1–3 times a week): Lubricate every 6–8 weeks.
You can find a video on maintaining the F37s here.
What type of footwear is suitable for the treadmill?
It is important to note that treadmills are best used with athletic shoes that have a smooth, flat sole. Trail shoes or shoes with studs or coarse soles can cause excessive wear, which can damage the equipment.
Can it connect to the SportstechLive app?
Yes, the F37s treadmill is compatible with the Sportstech Live app.
What advantages does the Sportstech F37s offer over other models?
The F37s stands out for its durability, varied training programs, and app integration.
How loud is the Sportstech F37s treadmill during operation?
The treadmill is relatively quiet for a home fitness machine. Noise levels remain acceptable even at higher speeds.
Can the treadmill be used at low temperatures?
The Sportstech F37s treadmill may malfunction at low temperatures. Ideally, it should be operated at room temperatures above 18°C.
How fast does the F37s treadmill go?
The F37s treadmill reaches a maximum speed of 20 km/h.
What is the maximum user weight for the F37s treadmill??
Yes, the Sportstech F37s is designed for users weighing up to 150 kg.
What are the dimensions of the machine when folded?
When folded, the machine measures 112 x 83,5 x 142 cm.
What are the dimensions of the running surface?
The running surface measures 132 × 48 cm and provides plenty of room for comfortable running.
What incline percentage can the treadmill reach?
The maximum incline is 10,5%.
What is the distance between the floor and the top of the running surface?
The distance from the floor to the top of the running surface is 170 mm.
What is the reset button for?
The reset button is there to help if a circuit breaker has tripped or a short circuit may have occurred. If this happens, the small button trips automatically and can be returned to its original position by pressing it.
Does the F37s have a TÜV seal?
Our products are carefully manufactured in compliance with strict European safety standards and regulations. We place great importance on ensuring that every component and detail meets our high quality requirements, so that we can offer you products with outstanding safety and reliability.
Troubleshooting & Quick Fixes
ERR SAFE - Error message.
Description:
The safety key is not in place, or the magnet is too weak. Your treadmill will not start unless the key is correctly in place.
Solution:
Check that the safety key is correctly inserted in its designated slot.
Check the magnetic force – if the magnet is weak, you can try using another magnet.
If that does not help, you will need a replacement safety key.
👉 The replacement can easily be carried out at home – without voiding your warranty and much more conveniently than returning the machine. If this does not achieve the desired result, we will be happy to collect your machine under warranty. Don't worry: If anything does not go as planned during the replacement and the machine is damaged as a result, we will of course take responsibility – provided that you have handled the machine carefully and respectfully.
Valid for: all models with a safety key
Console does not fit.
Here are a few tips to help you:
1. Insert the console extensions: Make sure the console extensions are correctly inserted into the side arms before tightening the console. This makes assembly easier.
2. Adjust the side uprights beforehand: Leave the side uprights loosely screwed in during assembly. This gives you enough room to attach the console more easily.
3. Carefully spread the uprights apart: If the console does not fit right away, carefully press the side uprights slightly apart so that you can fit the console more easily.
4. Tighten securely: Once the console is correctly fitted and secured, fully tighten the screws on the side uprights.
We hope these tips help. If you have any further questions or need assistance, please feel free to get in touch!
ERR 01 - Error message.
If the F37s treadmill displays error code ERR01, one of the communication cables connecting the circuit board to the display may be defective or have a loose connection.
SOLUTION:
1. Turn off the machine and wait 2 minutes.
2. Check all cable connections and plugs.
3. Turn the machine back on.
In the worst case, the communication cable or the electronic control board is defective; both parts can be replaced. This repair will not affect your warranty, and you can request the necessary spare parts here.
Related video guide on YouTube.
ERR 02 - Error message.
If the F37s treadmill displays error code ERR02, this is because the running surface is folded up, which triggers the error. Please lower the running surface before switching on the machine.
Related video guide on YouTube.
ERR 03 - Error message.
Error message 03 indicates a problem with the sensor attached to the motor. This may be due to a defective sensor or because the cable connection needs to be checked to make sure it is connected correctly.
Related video guide on YouTube.
ERR 04 - Error message
The error code "Error 04" or "E04" usually indicates that the machine is not receiving enough power – this is generally because too many electrical devices are connected to the same outlet at the same time.
We therefore recommend operating the machine by itself on a dedicated outlet (without a power strip) and testing it again.
ERR 05 - Error message.
⚠️ Error 05 – Motor defective
Description:
The error code Error 05 usually indicates that your machine's motor is defective or malfunctioning. Possible causes include a damaged motor controller, faulty wiring, or an error in the motor driver.
Solution:
- Make sure that all cable connections between the motor, control board, and power supply are secure and correctly connected.
- Check that no cables or plugs are damaged, loose, or scorched.
- If everything is connected correctly but the error message persists, the motor may need to be replaced.
➡️ You can order the appropriate spare part directly via the chatbot.
Note:
The replacement can usually be carried out at home by yourself – without voiding your warranty and without returning the entire machine. If the replacement does not achieve the desired result, please contact us again. We will be happy to help..
Don't worry: If anything does not go as planned during the replacement, we will take responsibility – provided that you handle the machine carefully and respectfully.
Related video guide on YouTube.
Error 10 – Incline motor
⚠️ Error 10 – Incline motor
Description:
The incline motor needs to be replaced.
Solution:
👉 Order the spare part directly via the chatbot.
➡️ The replacement can easily be carried out at home – without voiding your warranty and much more conveniently than returning the machine. If this does not achieve the desired result, we will be happy to collect your machine under warranty. Don't worry: If anything does not go as planned during the replacement and the machine is damaged as a result, we will of course take responsibility – provided that you have handled the machine carefully and respectfully.
Video guide:
Error 11 – Incline motor
⚠️ Error 11 – Incline motor
Description:
The incline motor also needs to be replaced in this case.
Solution:
👉 Order the spare part directly via the chatbot.
➡️ The replacement can easily be carried out at home – without voiding your warranty and much more conveniently than returning the machine. If this does not achieve the desired result, we will be happy to collect your machine under warranty. Don't worry: If anything does not go as planned during the replacement and the machine is damaged as a result, we will of course take responsibility – provided that you have handled the machine carefully and respectfully.
Running belt wobbles when running on the F37s treadmill.
Follow these instructions to correctly tension your F37s treadmill:
1. Choose the right tool - Depending on the model, you will need either a Phillips screwdriver or an Allen key. One of these tools is normally included with the treadmill.
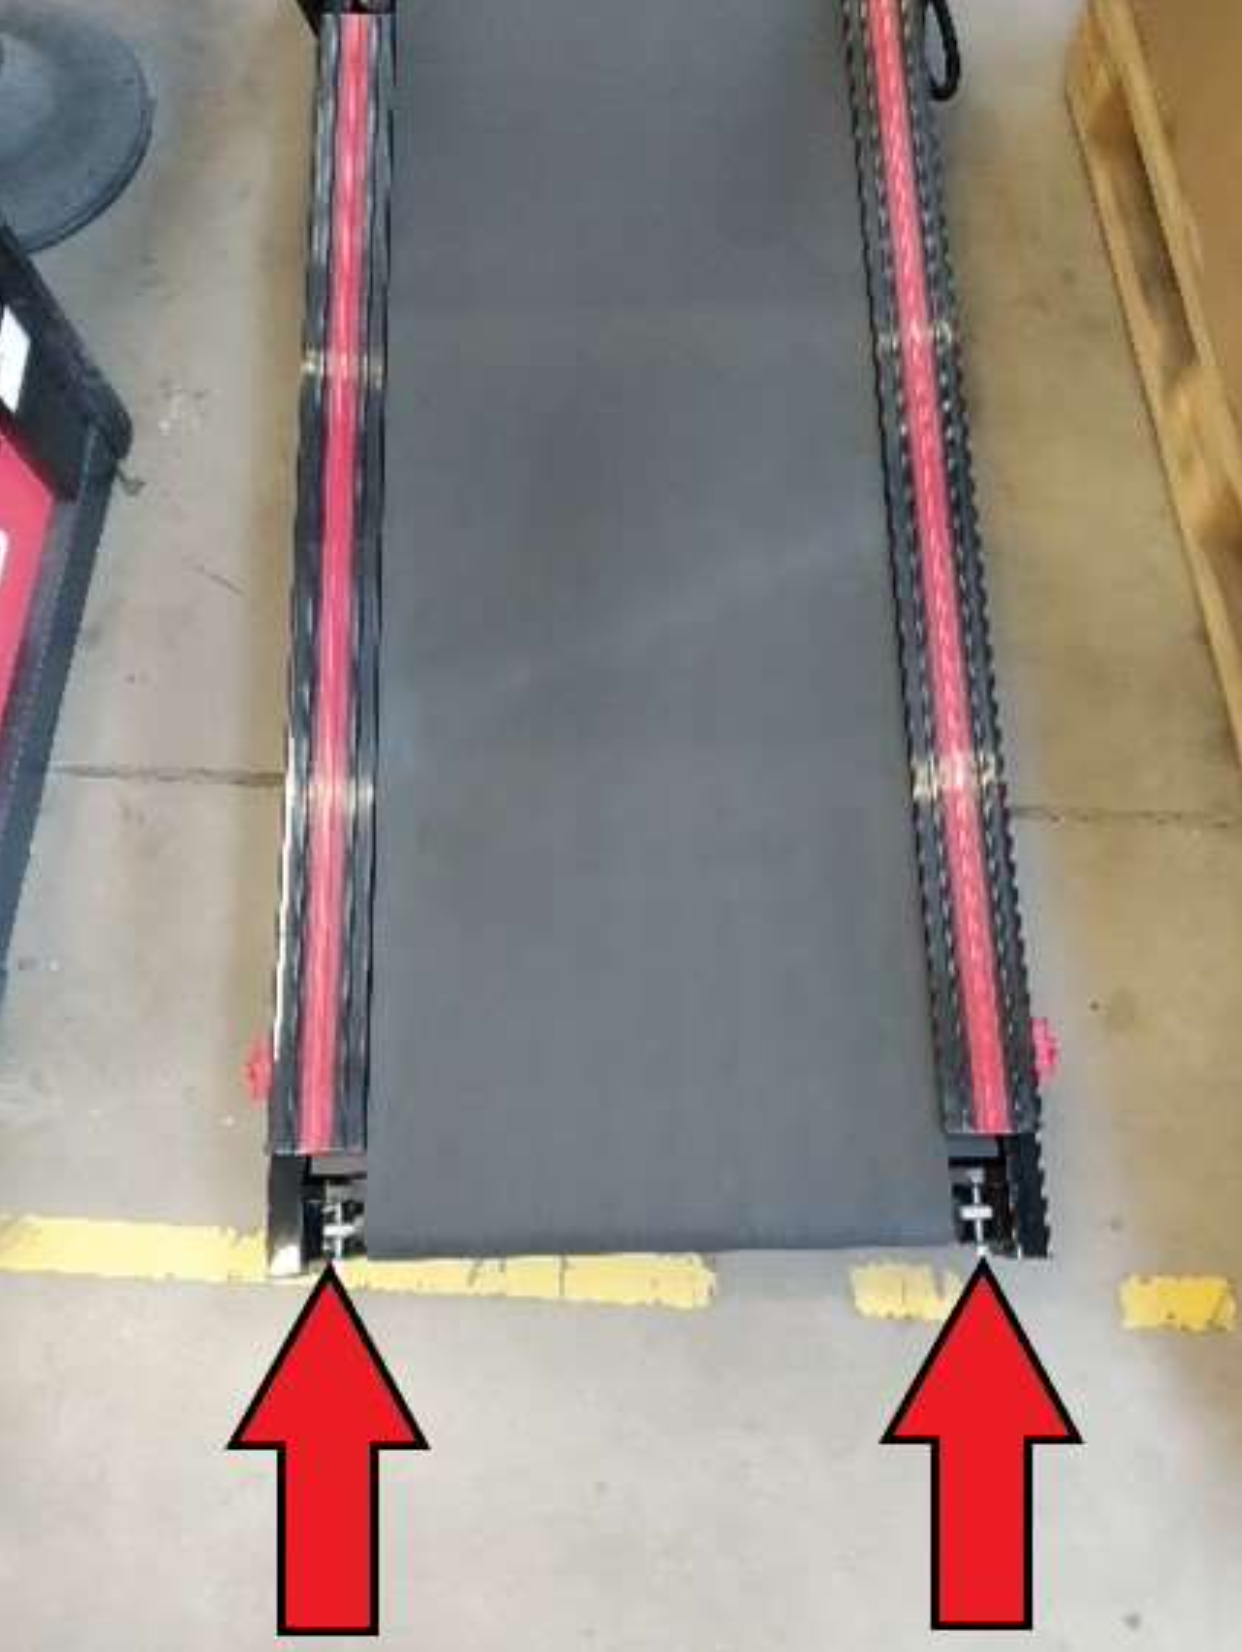
2. Adjust the tension - If the treadmill belt slips, increase the tension by turning the right and left adjustment screws a quarter turn clockwise. If, on the other hand, the belt gets stuck, reduce the tension by turning both screws a quarter turn counterclockwise.
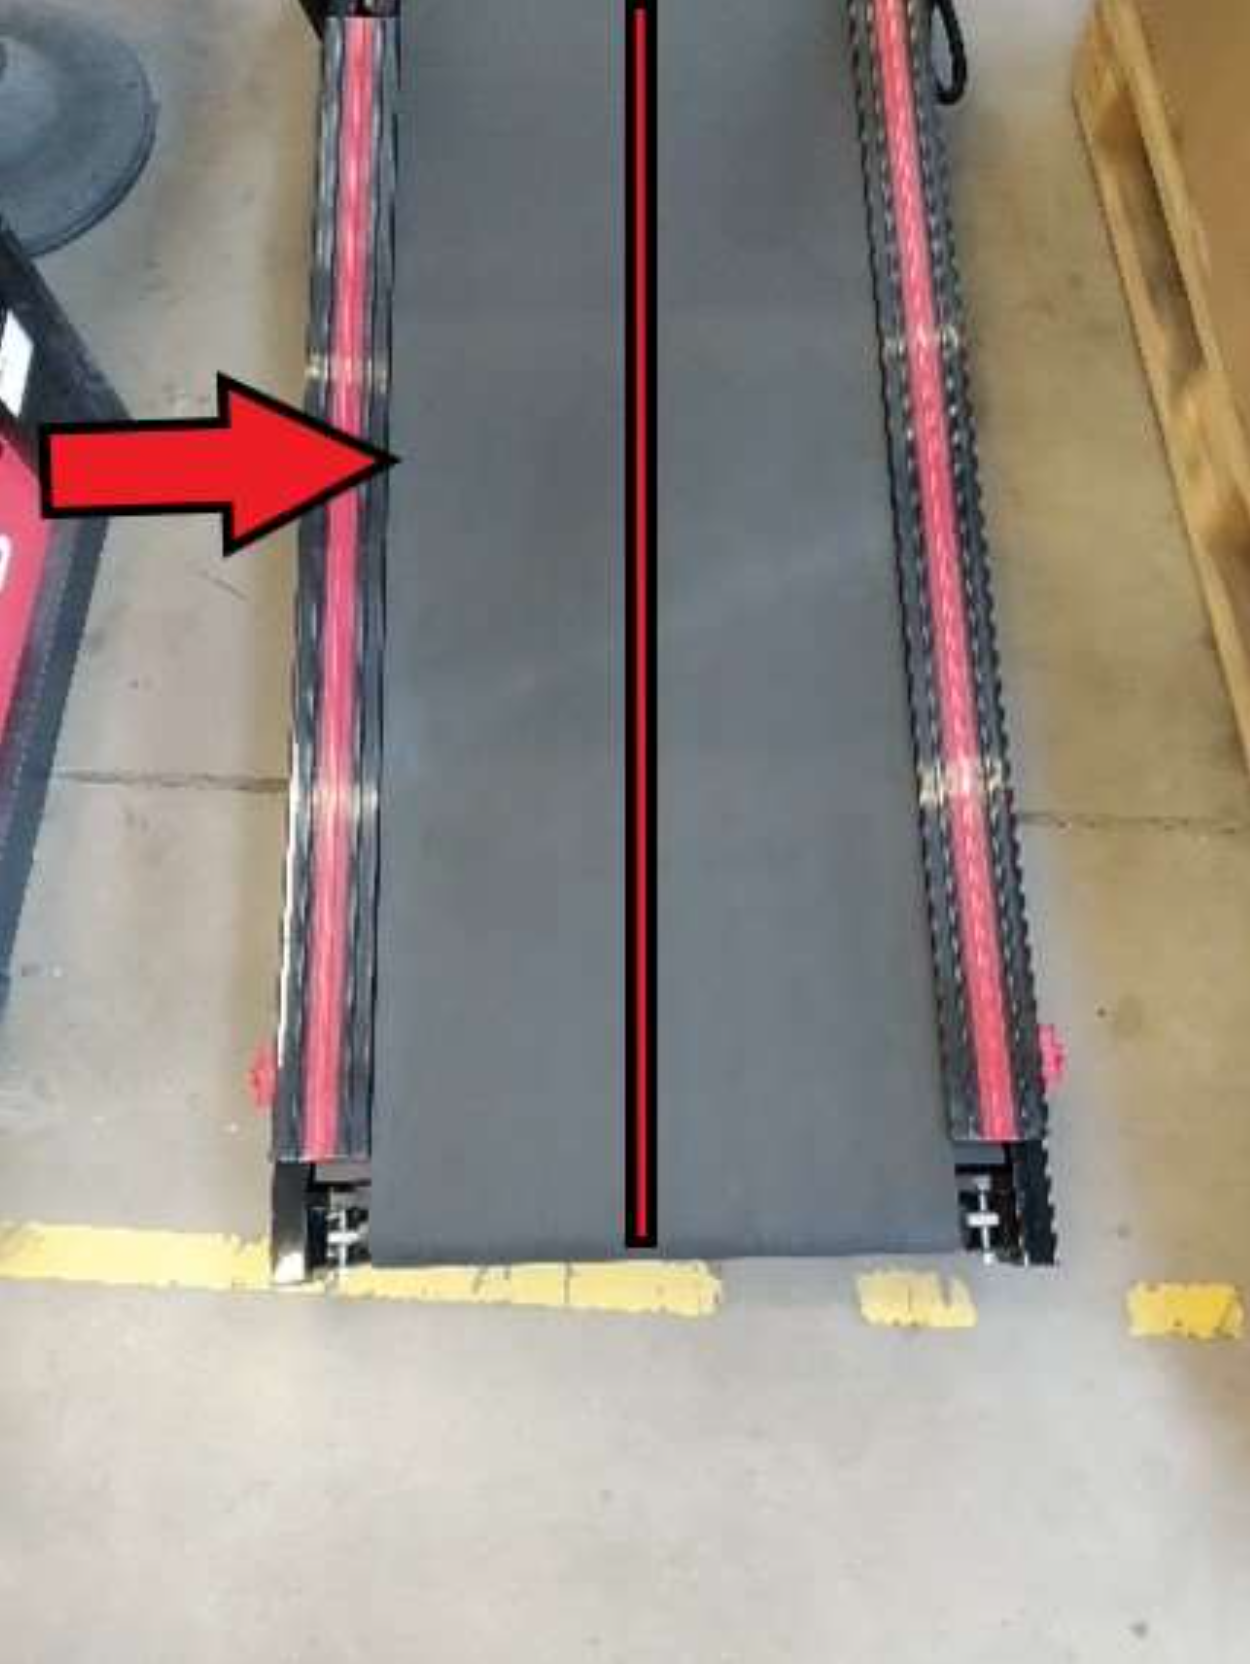
3. Check the adjustment, then set a speed of 1-2 km/h and walk on the treadmill. If the belt slips (the motor spins), increase the tension. If the belt and motor get stuck, reduce the tension. Also make sure that the belt runs in the center. If it does not, center it correctly.
4. If the running belt is not centered, increase the tension on the side toward which it is moving. (If it moves to the right = slightly tighten the right side or slightly loosen the left; if it moves to the left = slightly tighten the left side or slightly loosen the right.) Tighten by no more than a quarter turn at a time, then check again that the belt runs in the center.
F37s treadmill maintenance & cleaning.
At least once a year, remove the treadmill's motor cover and use a vacuum cleaner to remove any dust or dirt to ensure that the motor and drive system continue to function smoothly.
Cleaning: After each use, wipe sweat from the machine with a slightly damp cloth. Avoid getting any electrical or electronic components damp or wet. Do not use abrasive cleaners or solvents.
Maintenance: Check the condition of the machine before and after each workout. Make sure that all fasteners and protective covers are securely in place; tighten screws and nuts if necessary.
Check that the safety clip is working properly before each workout:
Stand on the side rails of the treadmill.
Start the treadmill at a low speed.
Pull the safety clip to stop the treadmill immediately.
The treadmill should not restart when the safety clip is removed.
Lubrication: The running belt must be adequately lubricated with silicone oil to ensure the machine functions properly and lasts a long time. The lubrication system is located on the underside of the machine.
Lubrication and inspection intervals:
Refill with silicone oil after the first 25 hours of operation or every 2-3 months.
Check lubrication regularly.
Refill with silicone oil after no more than 50 hours of operation or every 5-8 months.
Where do I add the lubricating oil on the F37s treadmill?
The oil filler is now located underneath the machine; the two red tubes are on the left and right.
The on/off button on the F37s lights up.
The on/off switch is not illuminated to minimize power consumption; this is intentional.
The F37s treadmill switches off by itself.
The F37s switches off after approx. 20–24 seconds. This is not an error, but the F37s automatic shut-off feature. It will happen after every start as long as no one is walking on the treadmill.
Related video guide on YouTube.
The display does not turn on after assembly.
Solution:
- Check whether any pins in the plug connections are bent. This is often the reason why the display does not turn on.
- One plug connection is located at the top of the side arm and the other at the bottom of the side arm.
- Carefully straighten any bent pins. In most cases, this should solve the problem.
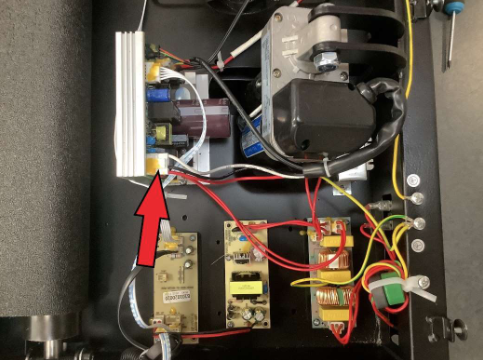
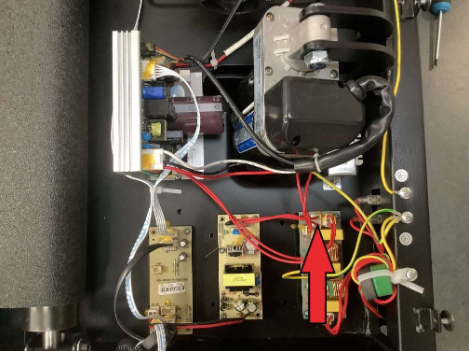
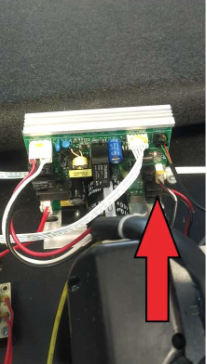
As soon as I switch on my treadmill, the RCD in the fuse box trips. What is causing this?
Solution:
- Disconnect the incline motor plug from the motor controller and check whether the treadmill starts. If it does, the incline motor is defective (please order the spare part: SP_F37s_47)
- Disconnect the plug from the LED power board and check whether the treadmill starts. If it does, the LED power board is defective (SP_F37s_40 and SP_F37s_41)
- Check whether the motor can be turned by hand: If it cannot be turned, the motor is defective (spare part: SP_F37s_66). If it can be turned, you can disconnect the motor cable from the motor controller and check whether the treadmill starts.
- Remove the motor controller, connect it to the plug from the filter board, and check whether the motor controller starts. This can be identified by the red LED. If this works, the EMI filter is defective (spare part: SP_F37s_39). If this does not work, the motor controller is defective (spare part: SP_F37s_108)
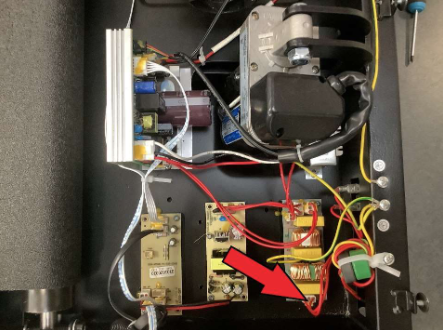
My treadmill won't turn on - what should I do?
You may often be able to fix the problem yourself without affecting your warranty.
Follow these simple steps to check for possible causes and solve the problem:
- Switch off the treadmill and unplug it from the power outlet. This is important to make sure there is no electrical connection while you inspect the machine.
- Carefully open the motor cover. It is usually located underneath the treadmill and may be secured with screws or snap fasteners, depending on the model.
- Check that all cable connections are secure, especially those between the motor and control unit. Loose or damaged cable connections can sometimes prevent the treadmill from starting.
- If necessary, reconnect any loose connections securely. Make sure the connections are secure to ensure that the treadmill works properly.
- Close the motor cover and reconnect the treadmill to the power outlet. Once you have completed the check, close the cover and test the treadmill by plugging it back in.
If your treadmill still does not work after following these steps, we recommend contacting our customer support team for further assistance. Our team will be happy to help you resolve the problem and make sure you can get back to your workout as soon as possible.
Repair instructions
Replacing the motor on the F37s treadmill
Instructions for replacing the motor on an F37s treadmill:
Tools required:
- Phillips screwdriver
- 2x 14 mm open-end wrenches
- Ratchet set with various attachments in different sizes.
- You can request the necessary spare parts here.
Preparation:
- Make sure that the treadmill is on a level surface and unplugged from the power supply.
- If possible, set the treadmill to the maximum incline. Once it has reached this position, switch off the power supply and wait a few minutes for the system to discharge.
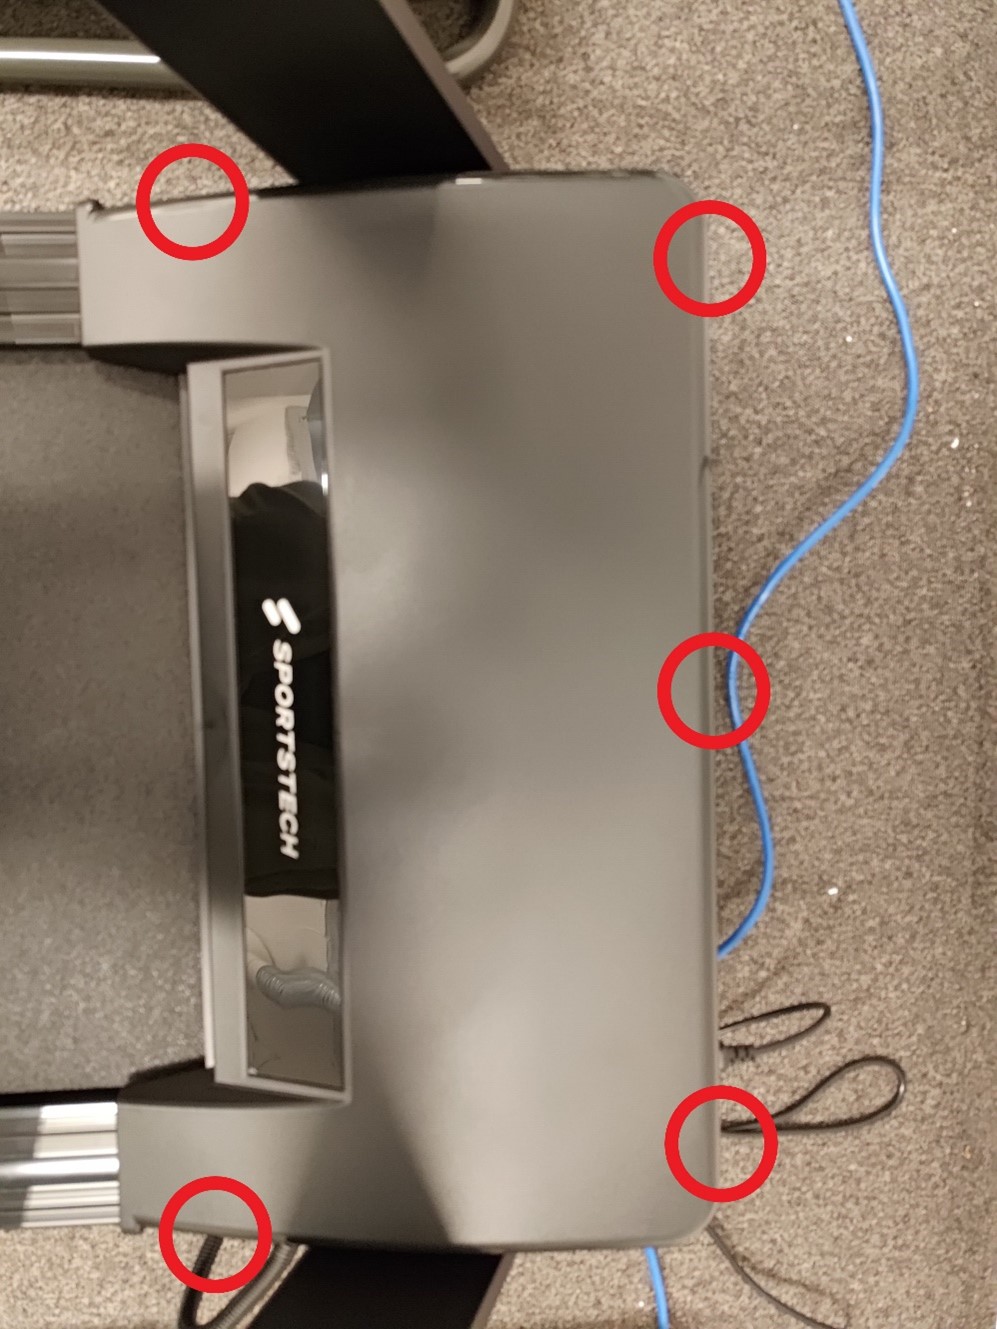
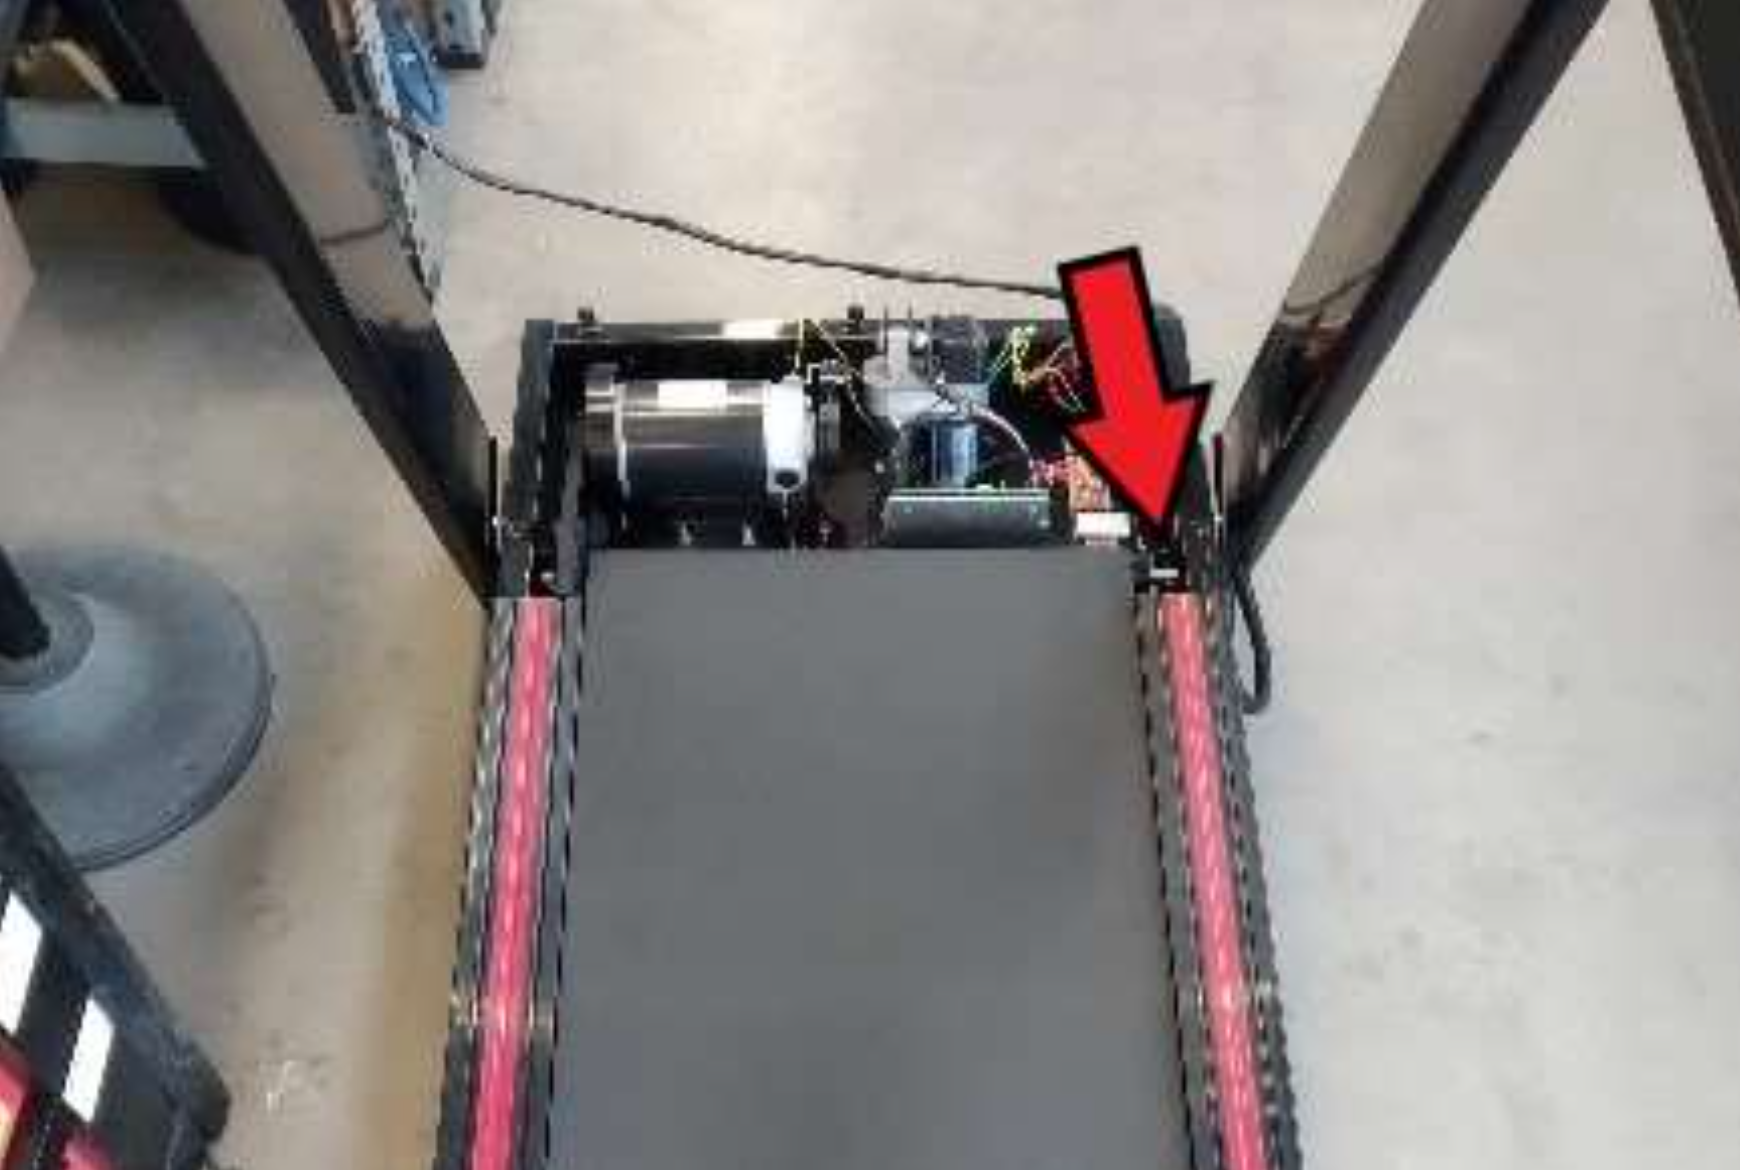
- Open the motor cover by removing the 5 screws marked in the photo.
Steps to replace the motor:
1. Loosen the four motor bracket mounting screws.
2. Loosen the adjustment screw on the motor bracket and remove the four mounting screws.
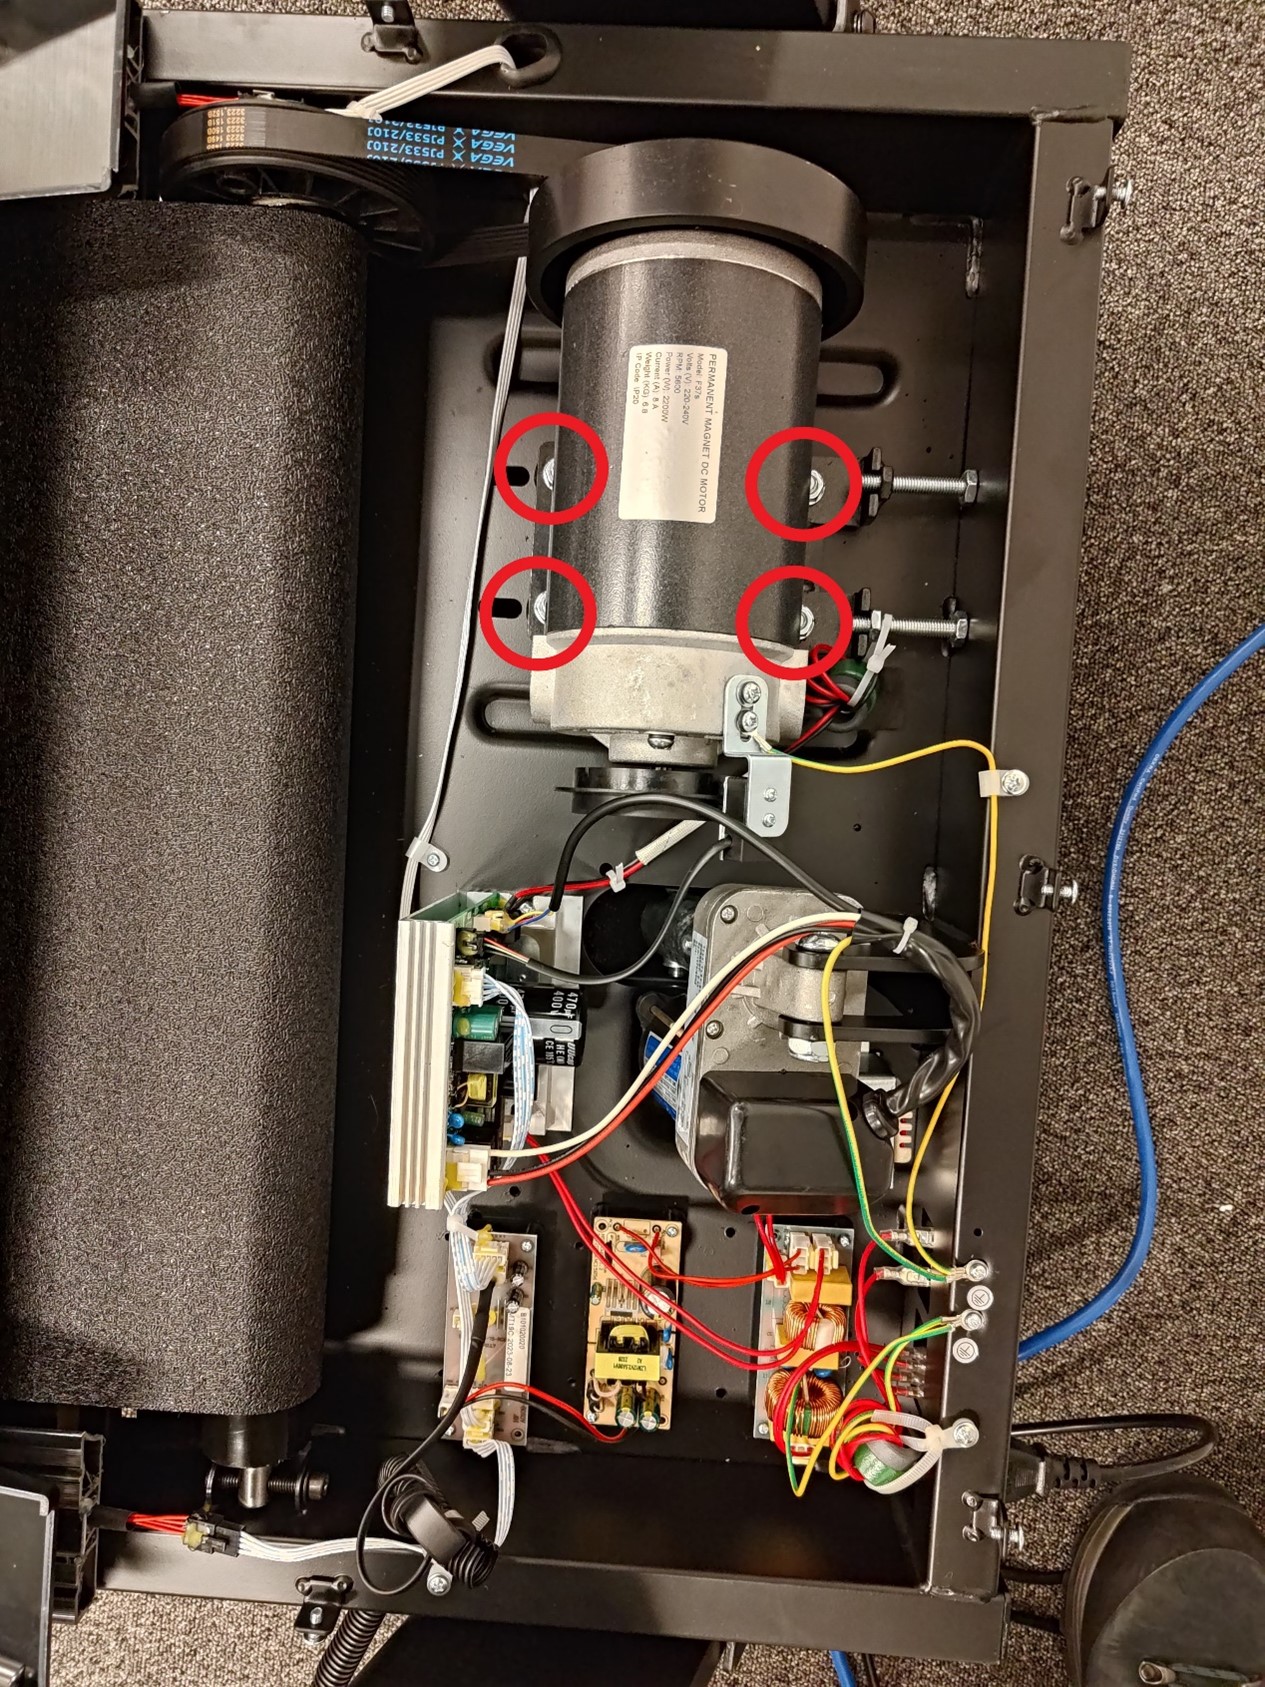
3. Disconnect the cables connecting the motor to the PCB; take a photo of the connections beforehand.
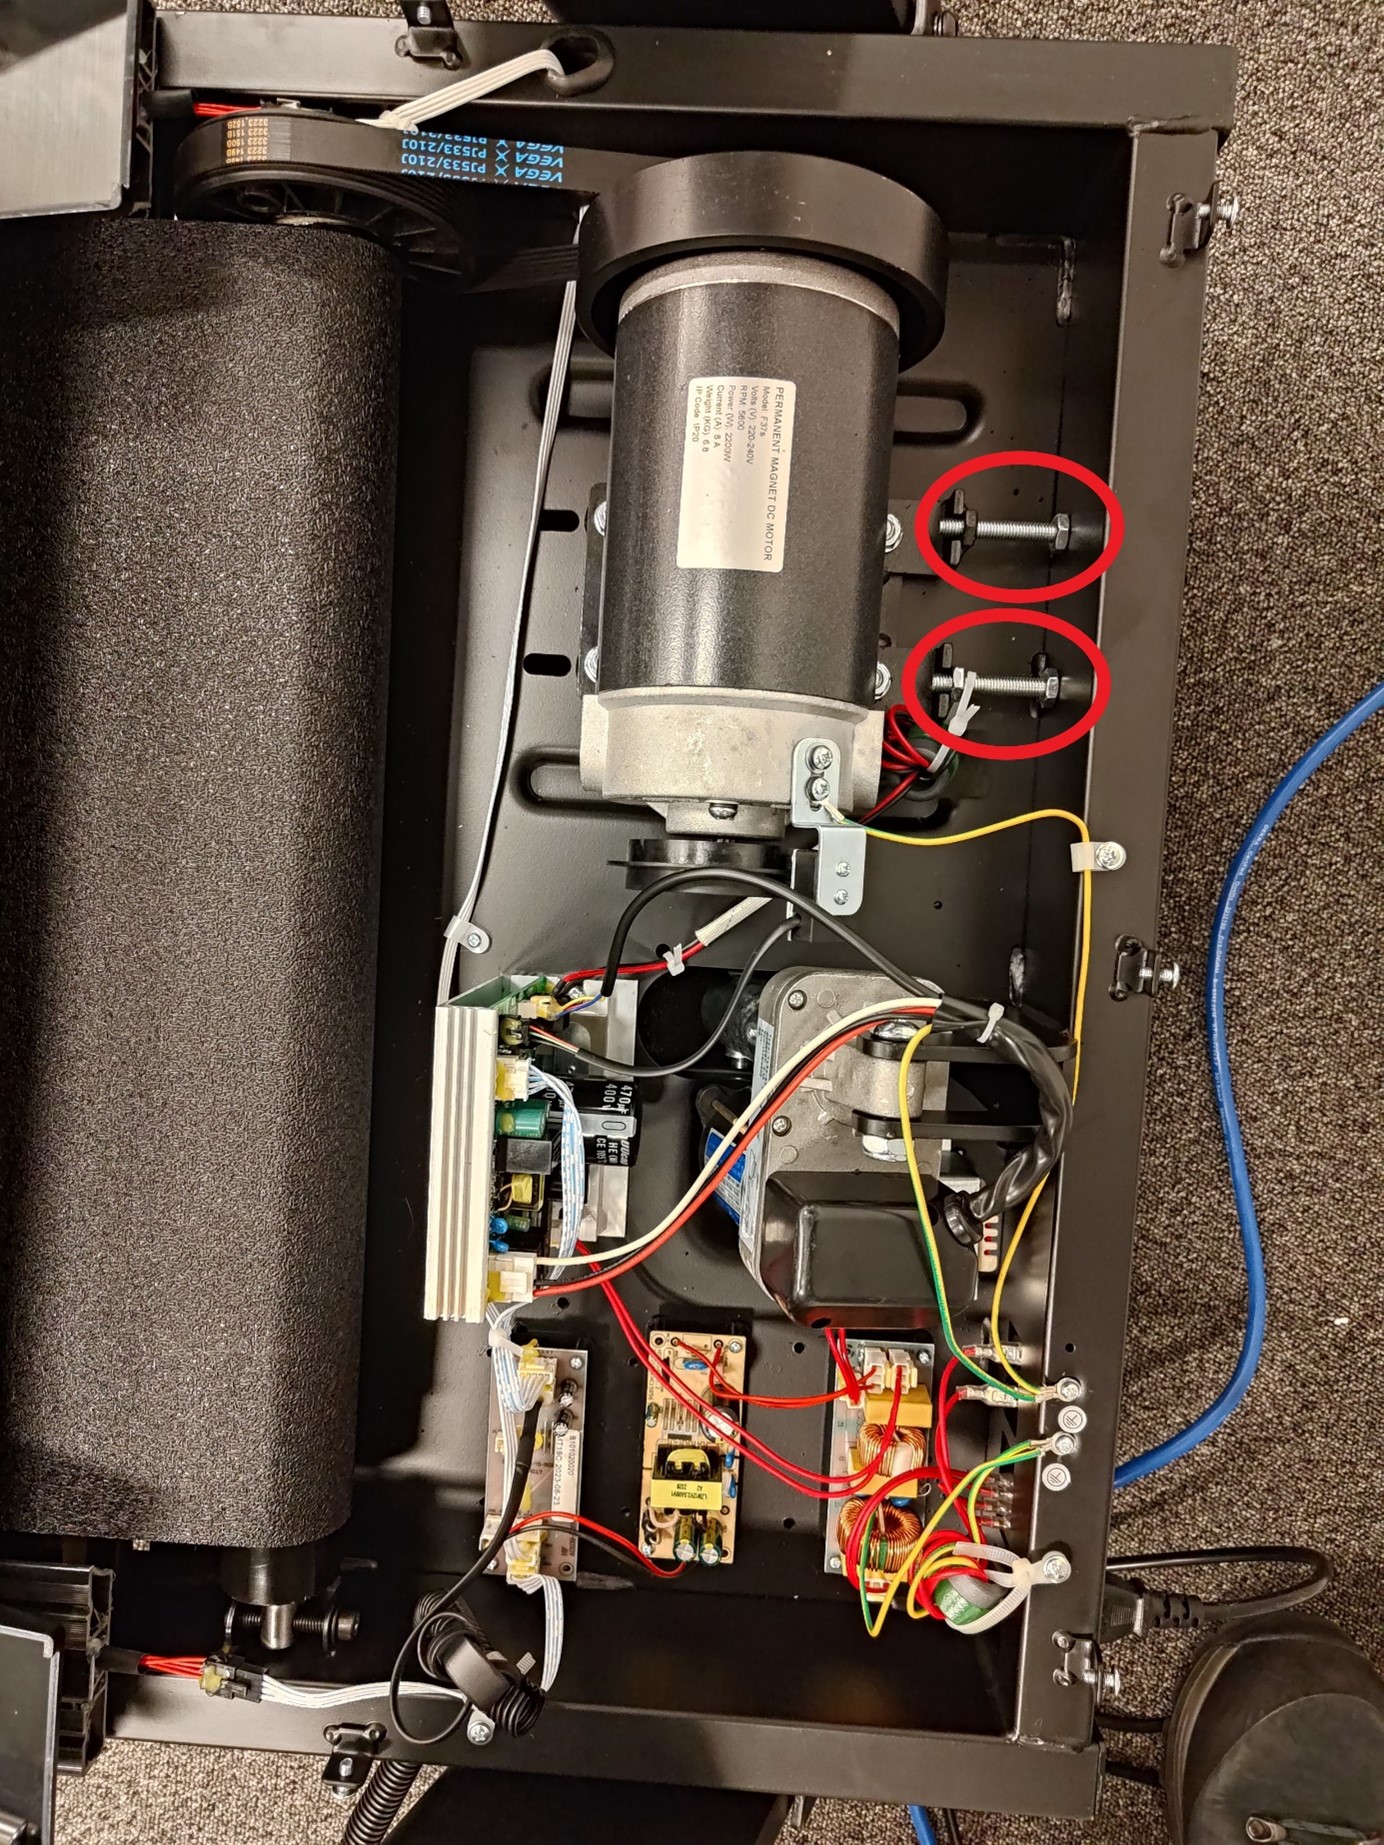
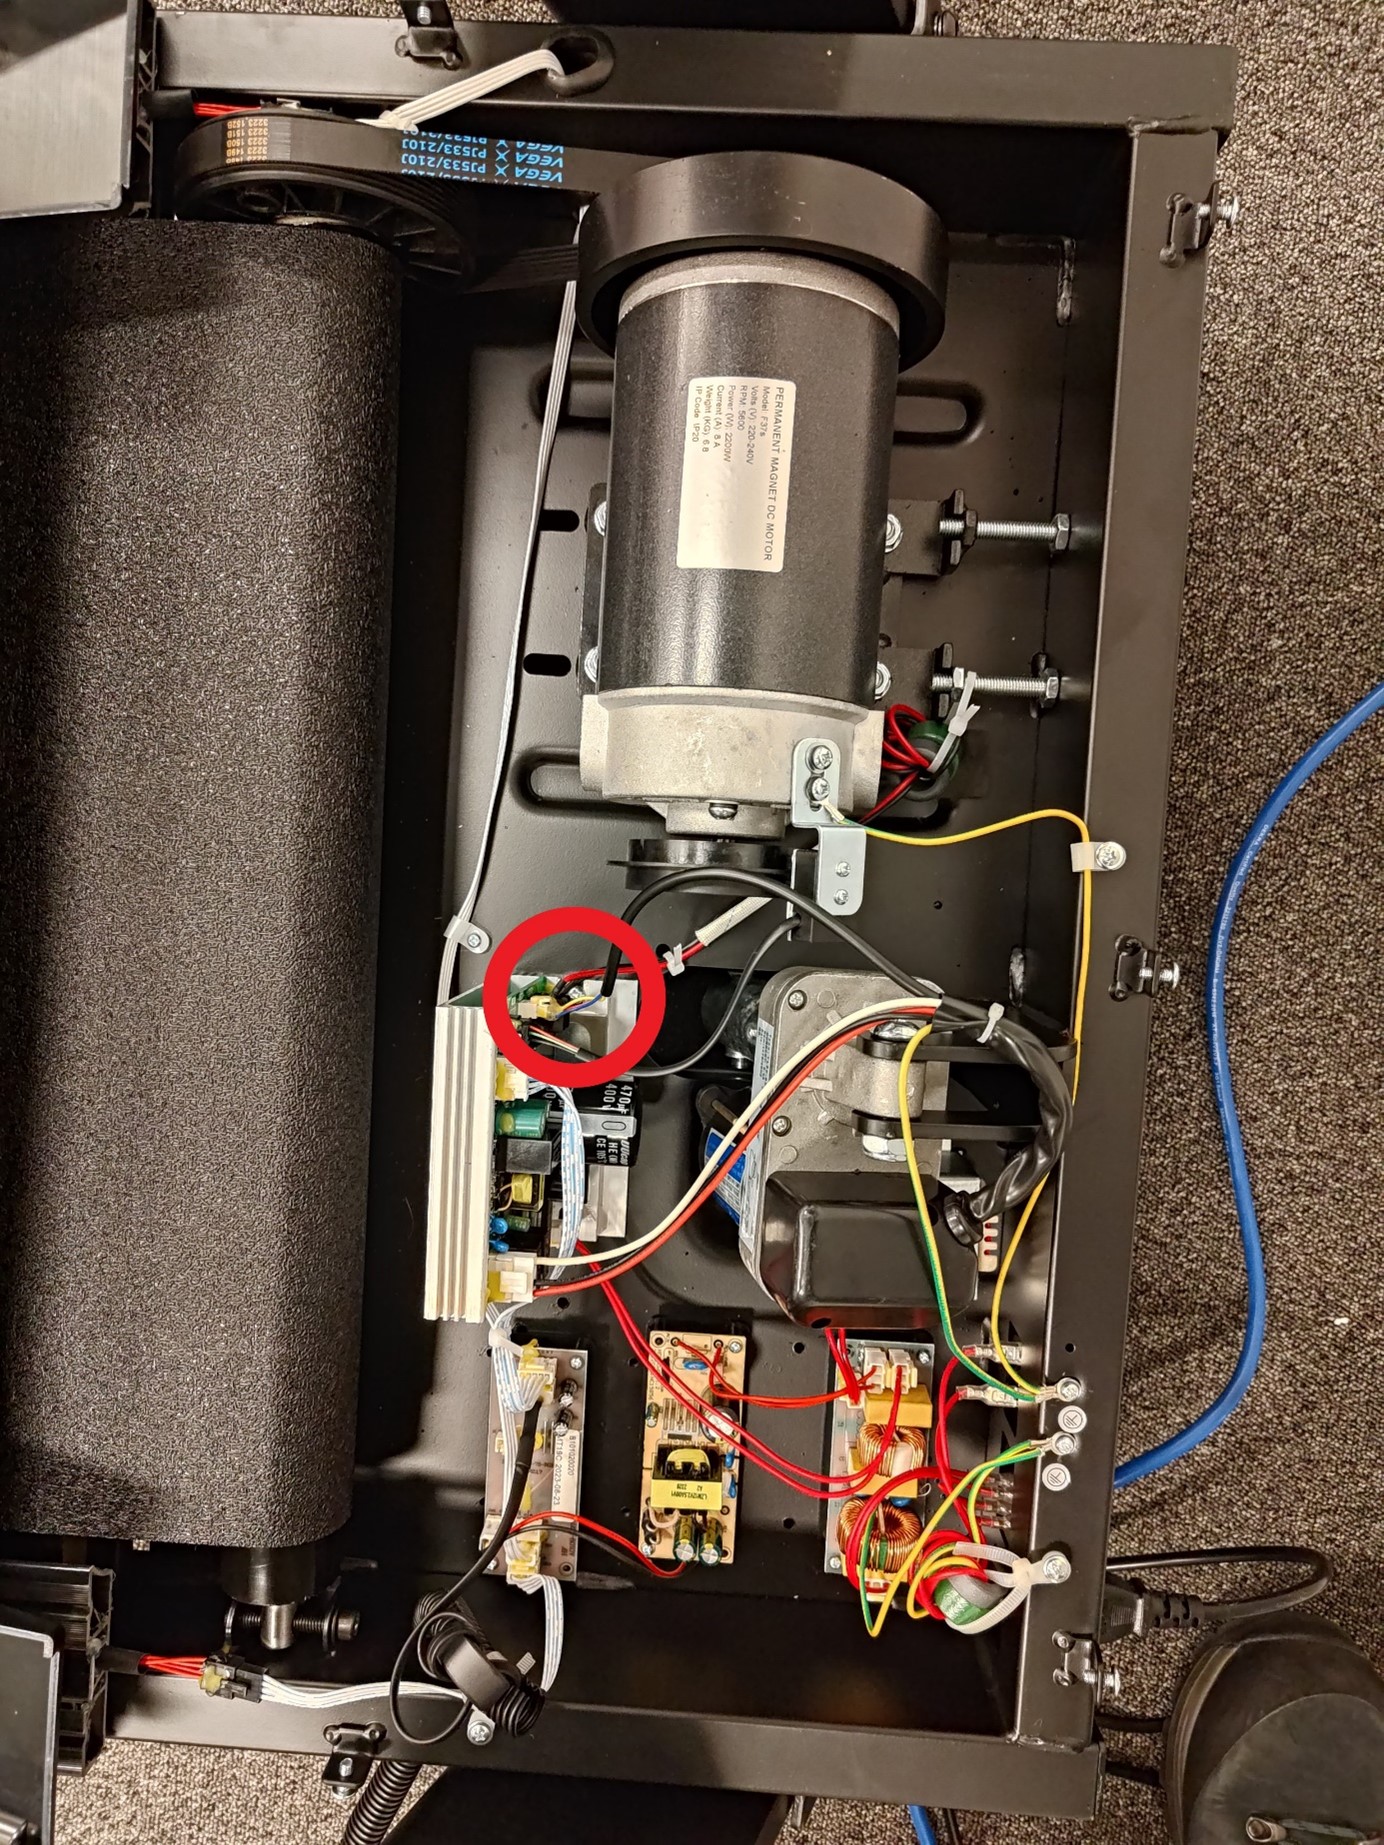
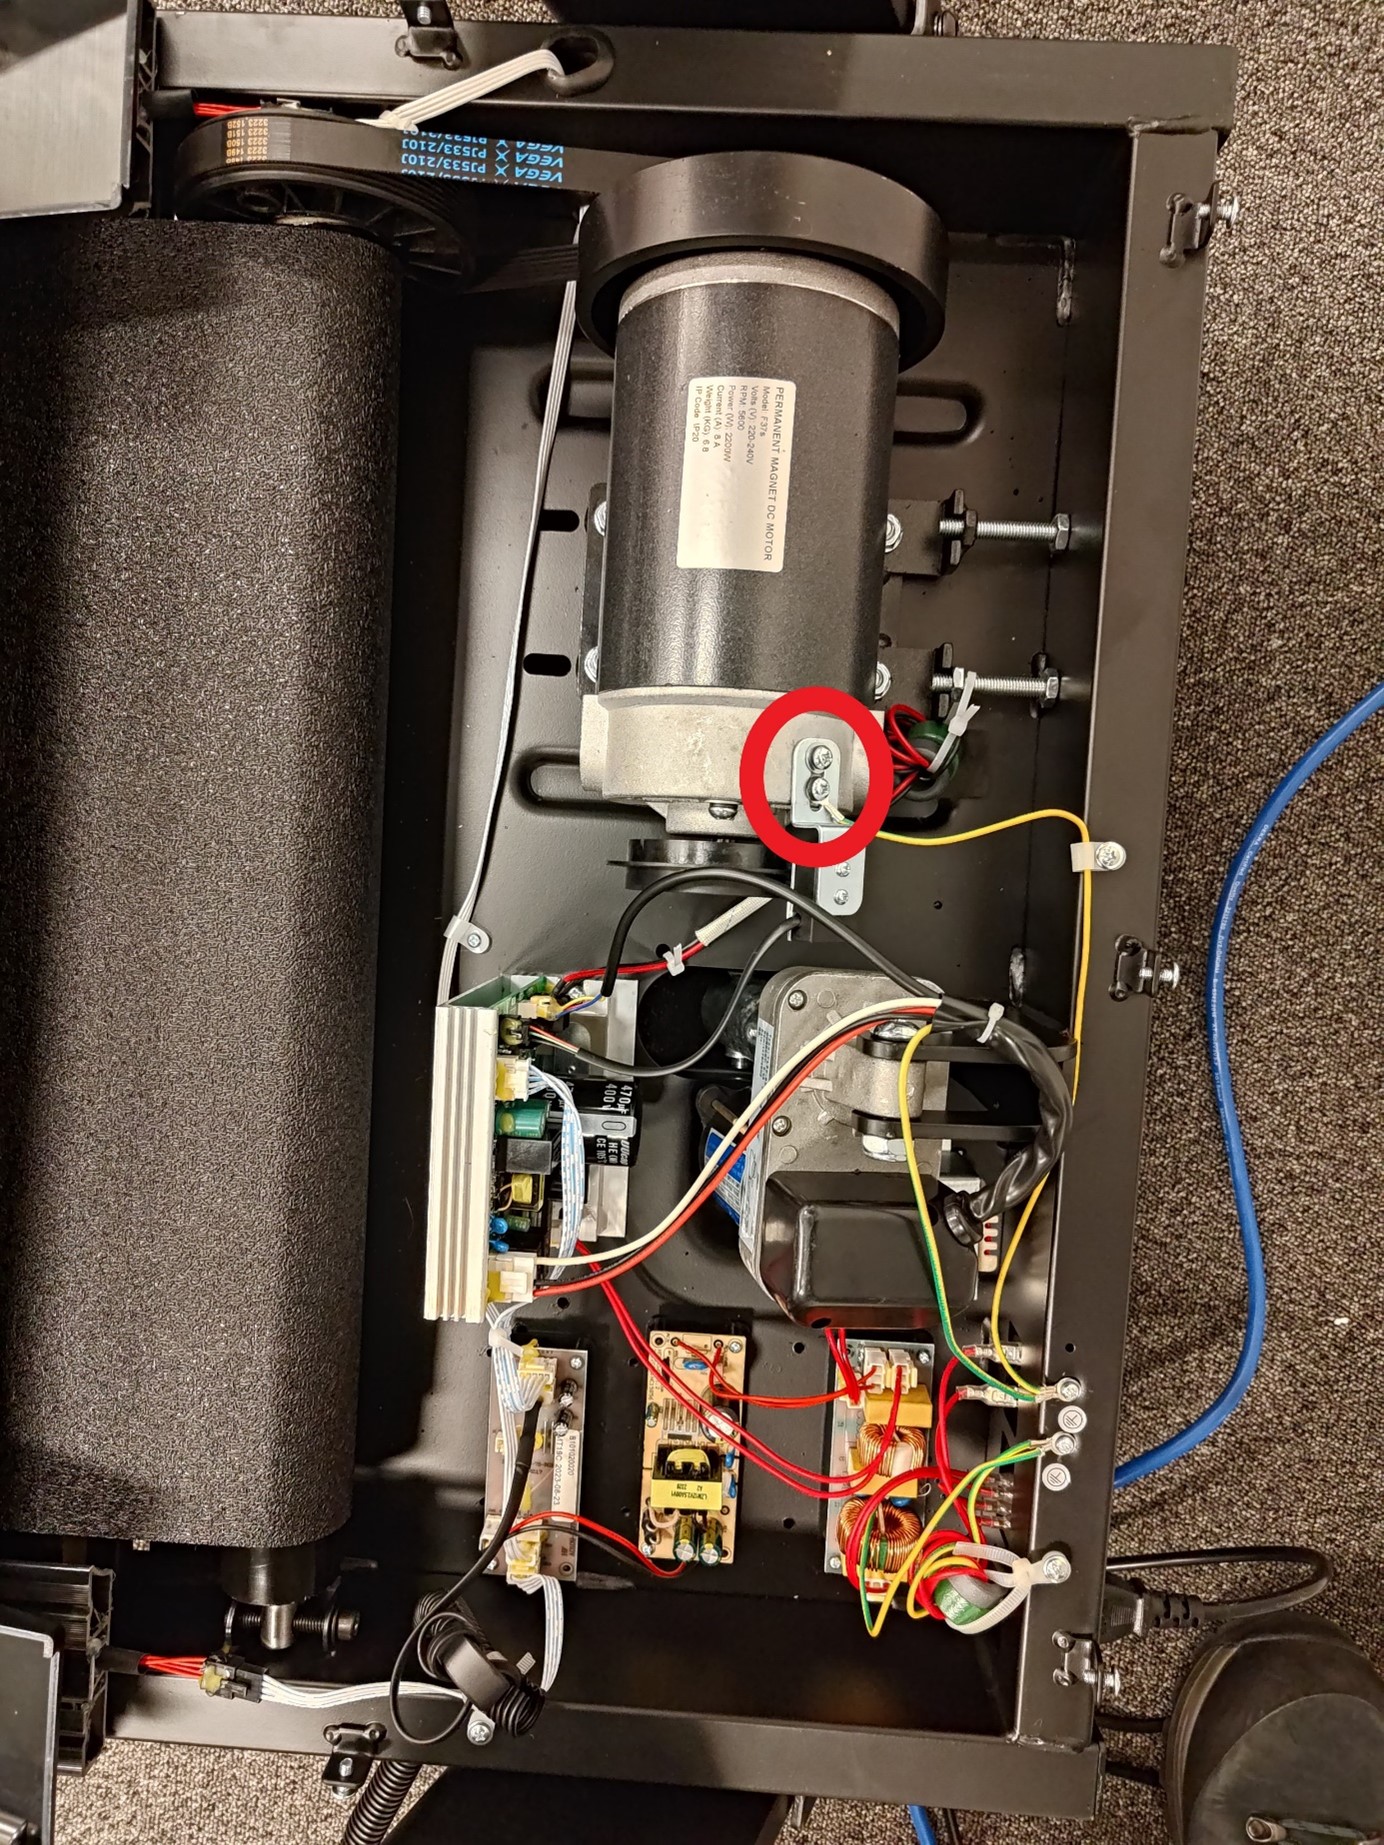
4. Unscrew the motor's ground wire.
5. Replace the old motor with the new one.
6. Connect the cables from the new motor to the PCB and the frame.
7. Insert the four mounting screws, but do not tighten them yet.
8. Put the belt in place, making sure it is centered on the motor shaft and pulley.
9. Turn the adjustment screw to tension the belt until it can still be turned by hand by approx. 90°.
10. Now tighten the four adjustment screws.
11. Put the motor cover back on and screw it into place.
Caution:
- When the treadmill is connected to the power supply, the incline motor will automatically return it to the lowest level.
Related video guide on YouTube.
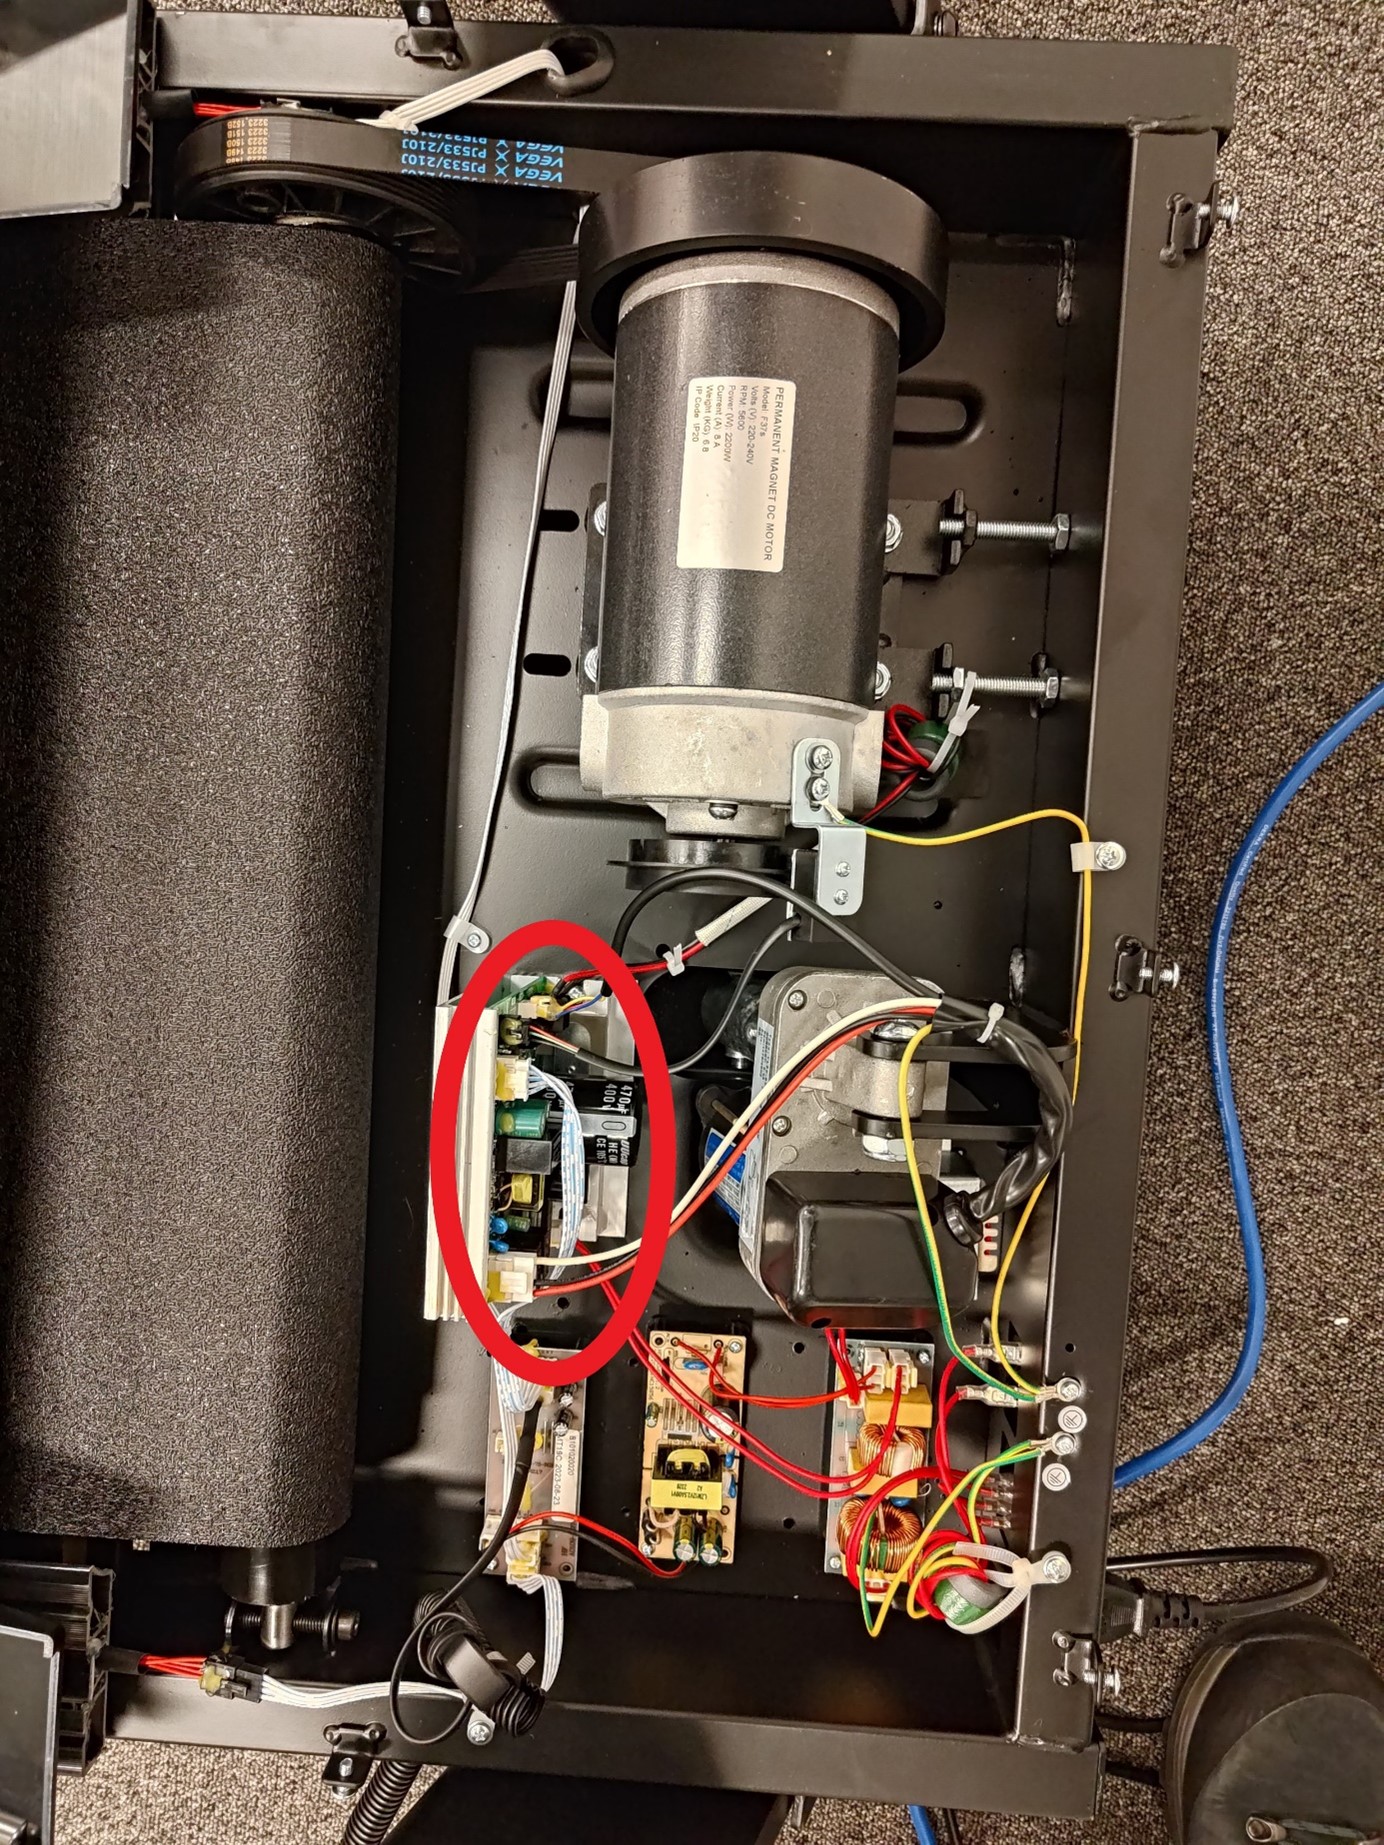
Replacing the F37s control board (PCB)
Instructions for replacing the control board (PCB) on the F37s treadmill
Video guide:
F37s PCB replacement - YouTube
Written instructions
Preparation:
- How do I get the spare parts I need? – Sportstech Brands Holding GmbH - DE
- Make sure that the treadmill is on a level surface and unplugged from the power supply.
- Open the motor cover by removing the 5 screws marked in the photo.
Steps to replace the control board (PCB):
- Before disconnecting all the plugs from the PCB, take a photo of the PCB so that you can reconnect all the plugs in the right places during installation.
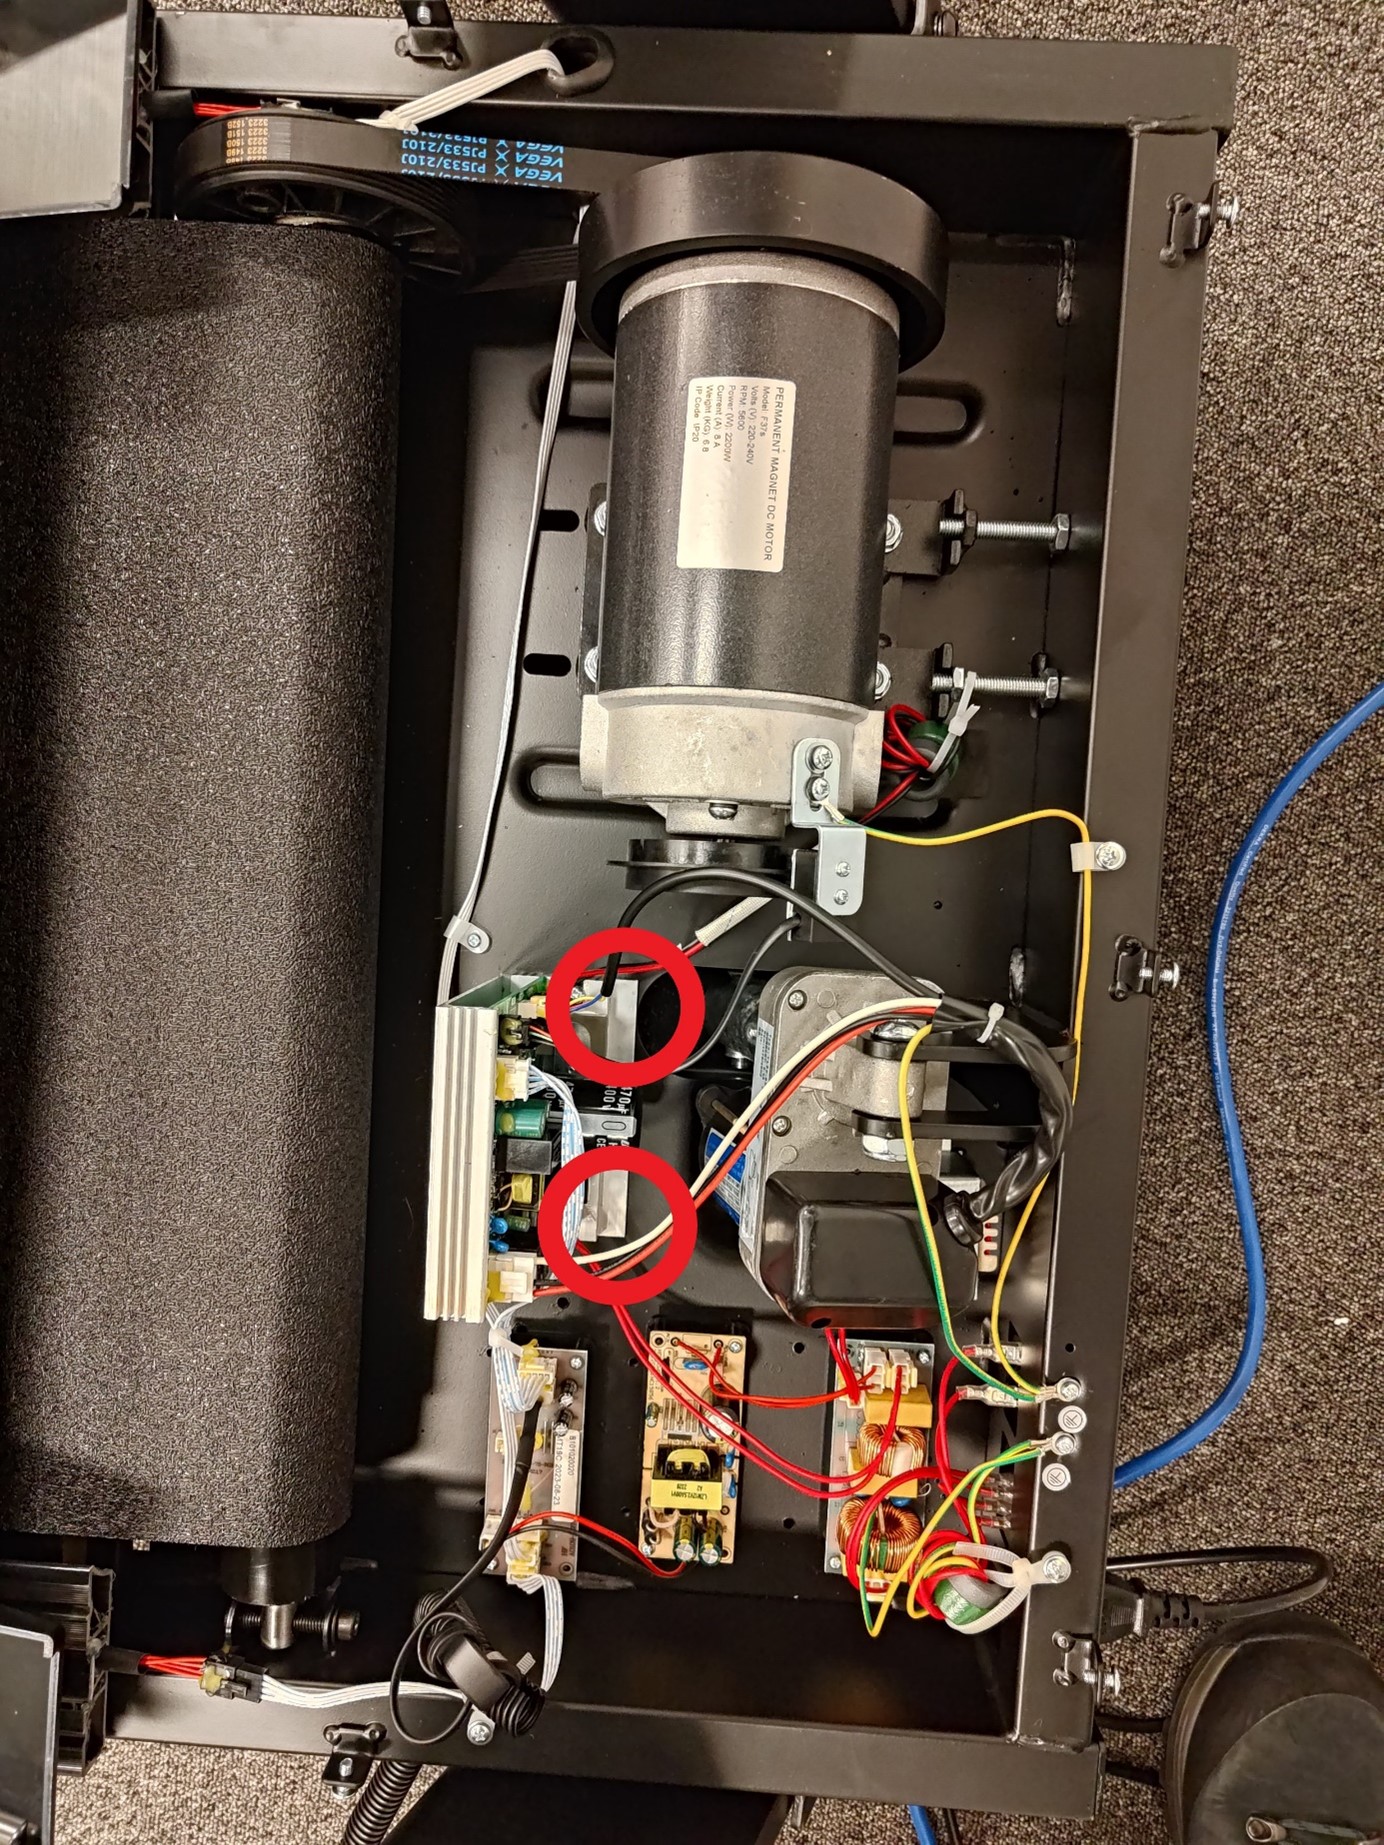
- Disconnect all plugs from the PCB.
- Remove the PCB (control unit) mounting screws, a total of 2 Phillips screws.
- Remove the PCB and replace it with the spare part.
- Reconnect all cables, insert the 2 retaining screws, and tighten them.
- Put the motor cover back on and screw it into place.
- Connect the machine to the power supply and check that it works.
Replacing the running deck on the F37s treadmill
Instructions for replacing the running deck on the F37s treadmill
Preparation:
- How do I get the spare parts I need? – Sportstech Brands Holding GmbH - DE
- Make sure that the treadmill is on a level surface and unplugged from the power supply.
- Remove the motor cover by undoing the 5 screws marked in the photo.
Steps to replace the running deck:
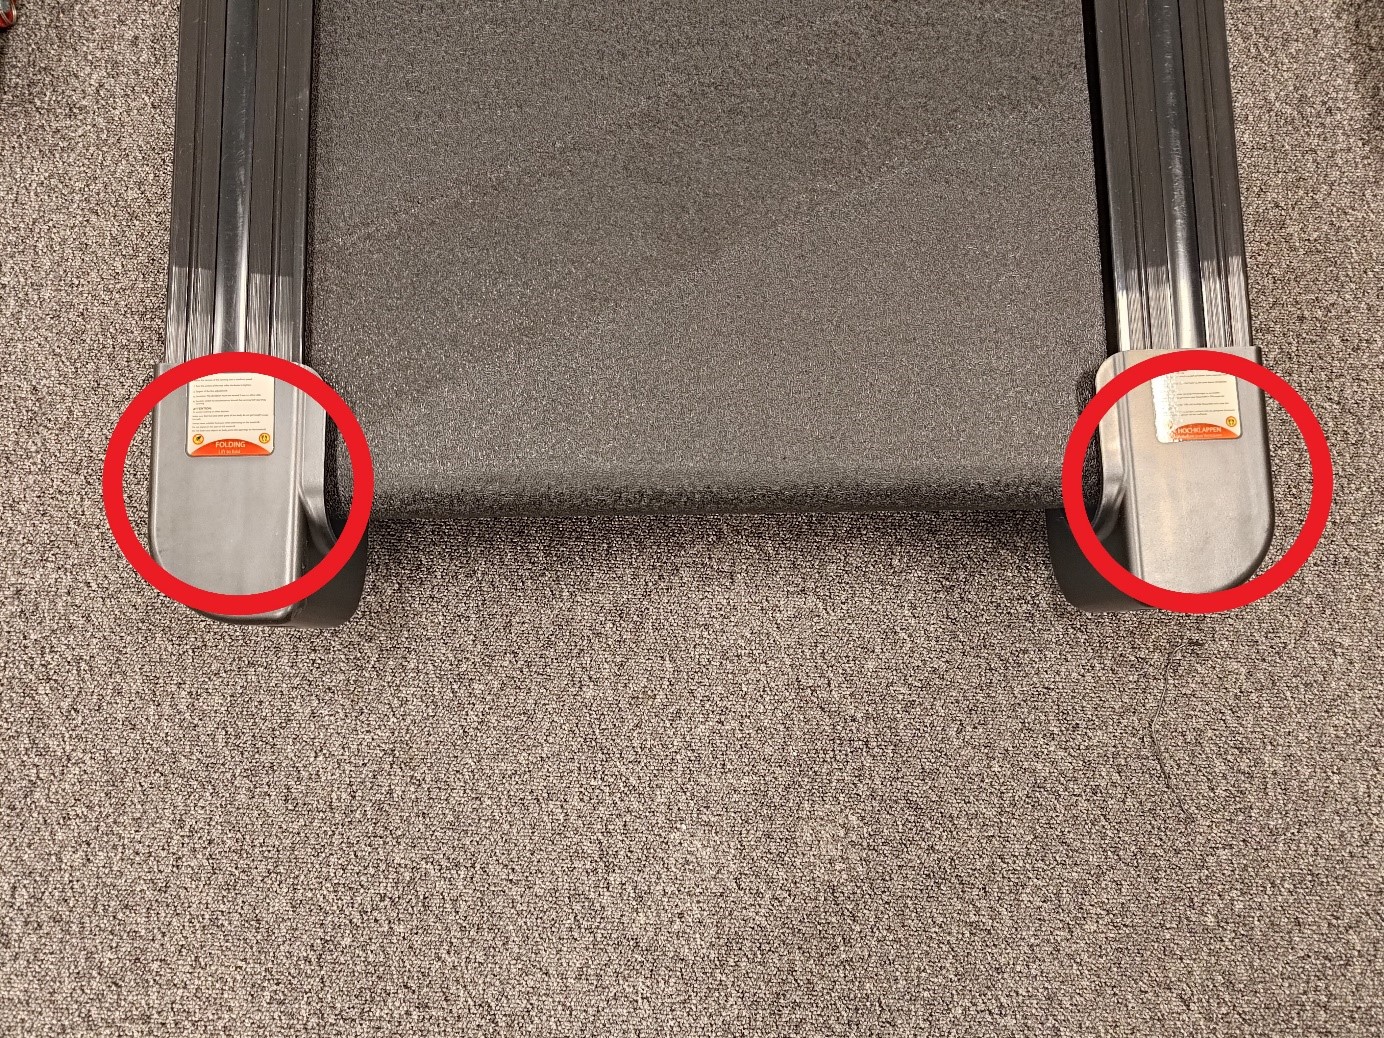
- Remove the two rear covers by folding up the running surface.
- Remove the foot rails, which can be pulled out toward the rear.
- The mounting screws are now visible; remove all the screws.
- Pull the defective deck out to the side.
- Install the new deck in reverse order.
Related video guide on YouTube.
Replacing the front roller
Instructions for replacing the front roller on the F37s treadmill
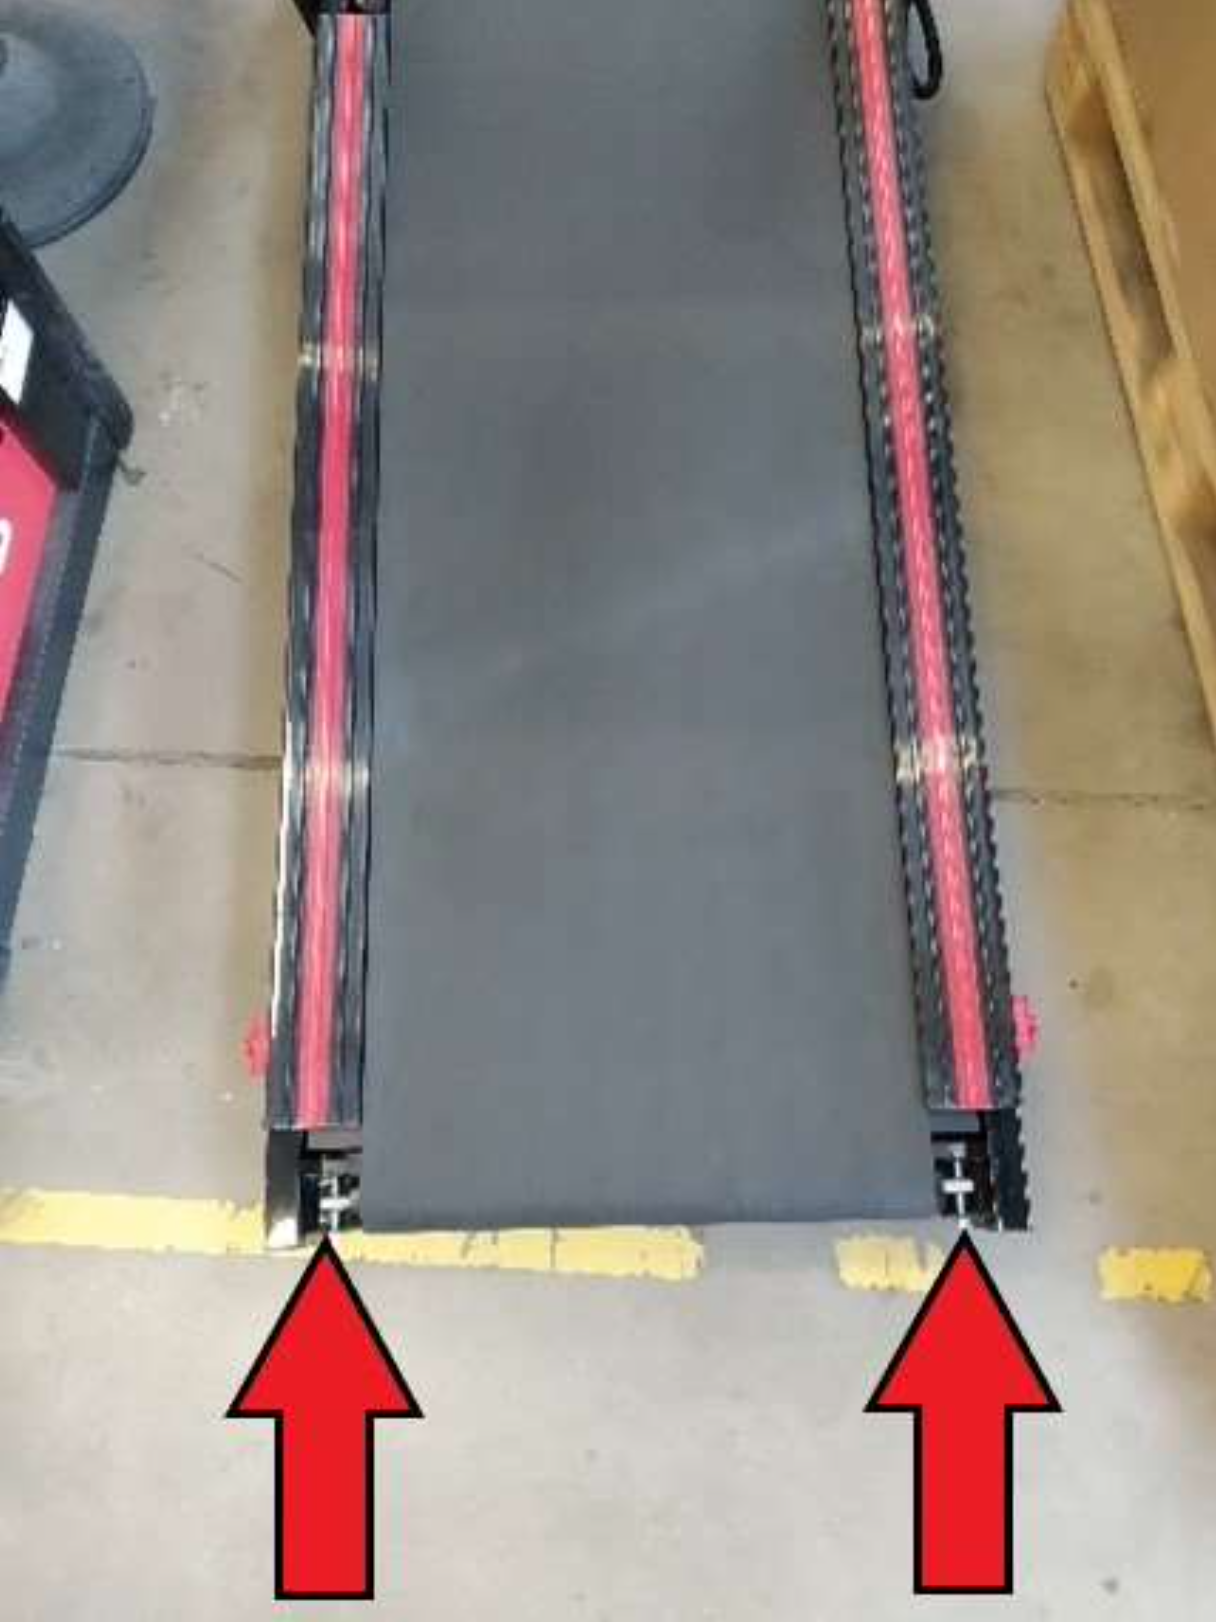
- Loosen the screws at the back of the treadmill until the running belt is loose.
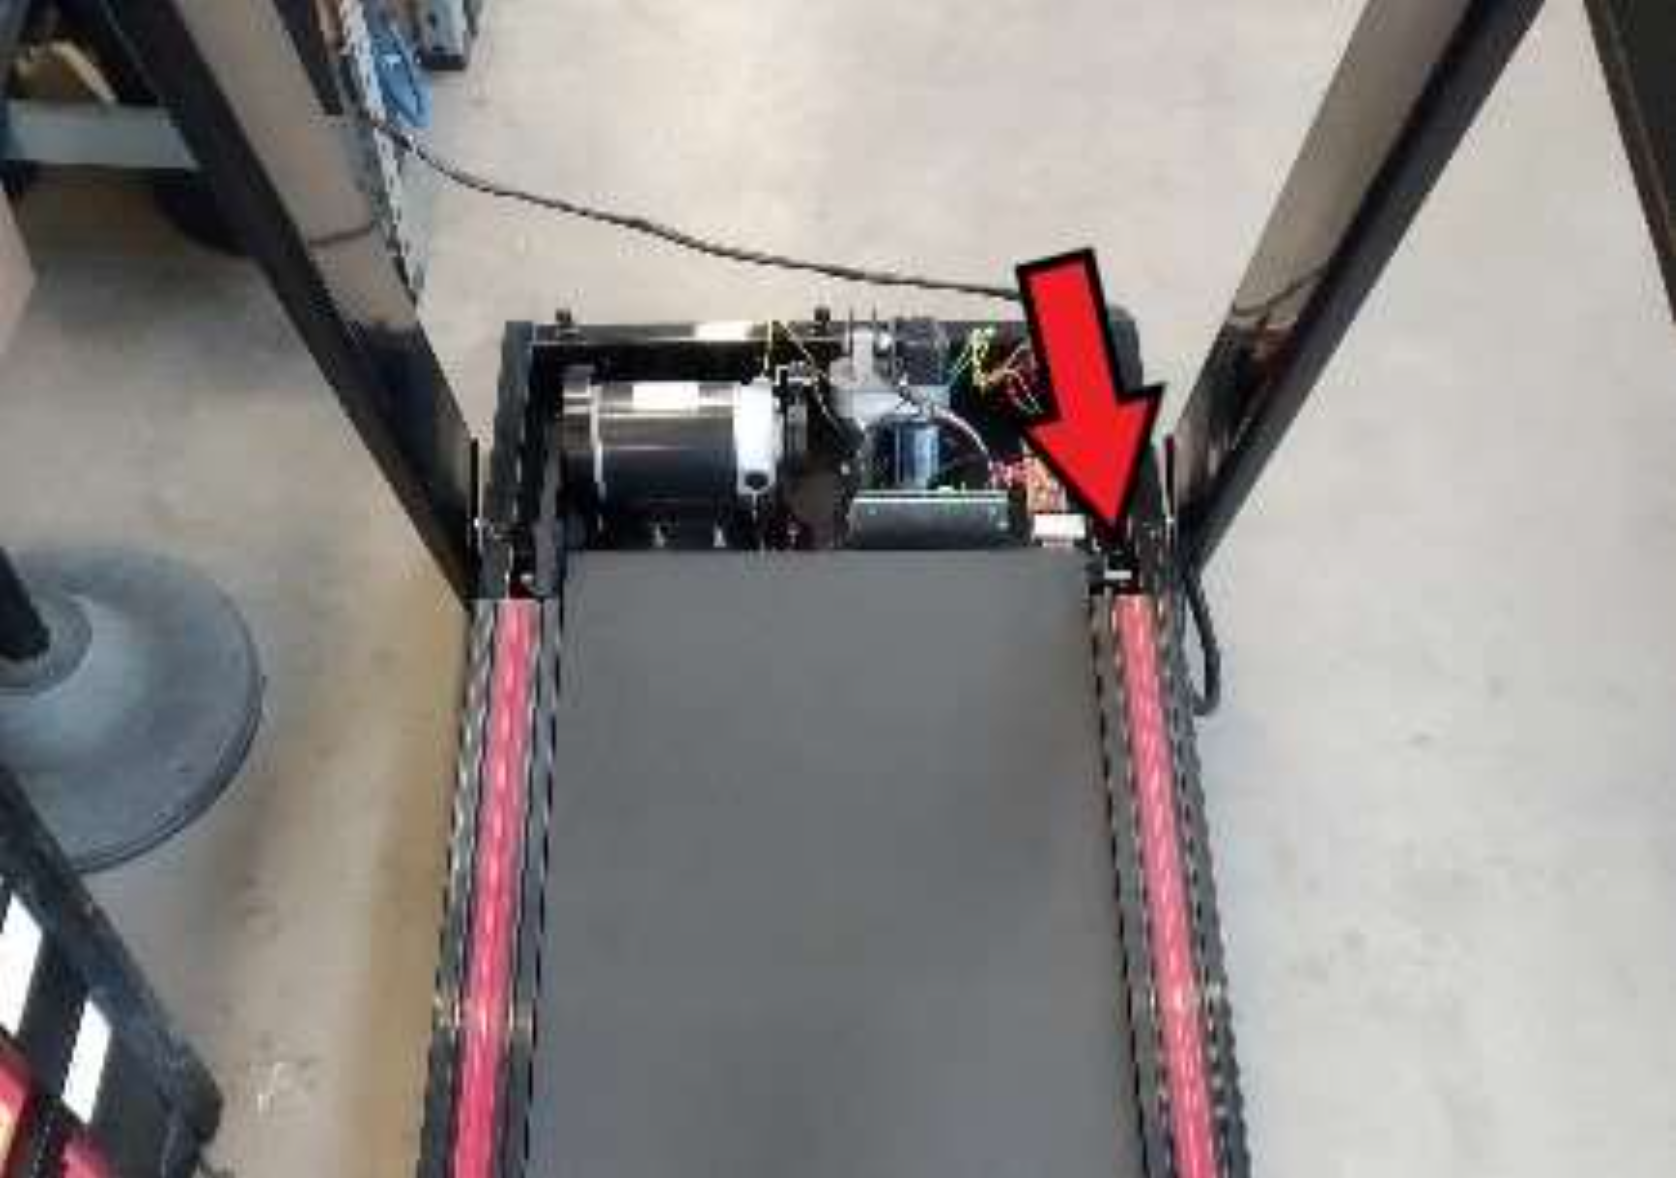
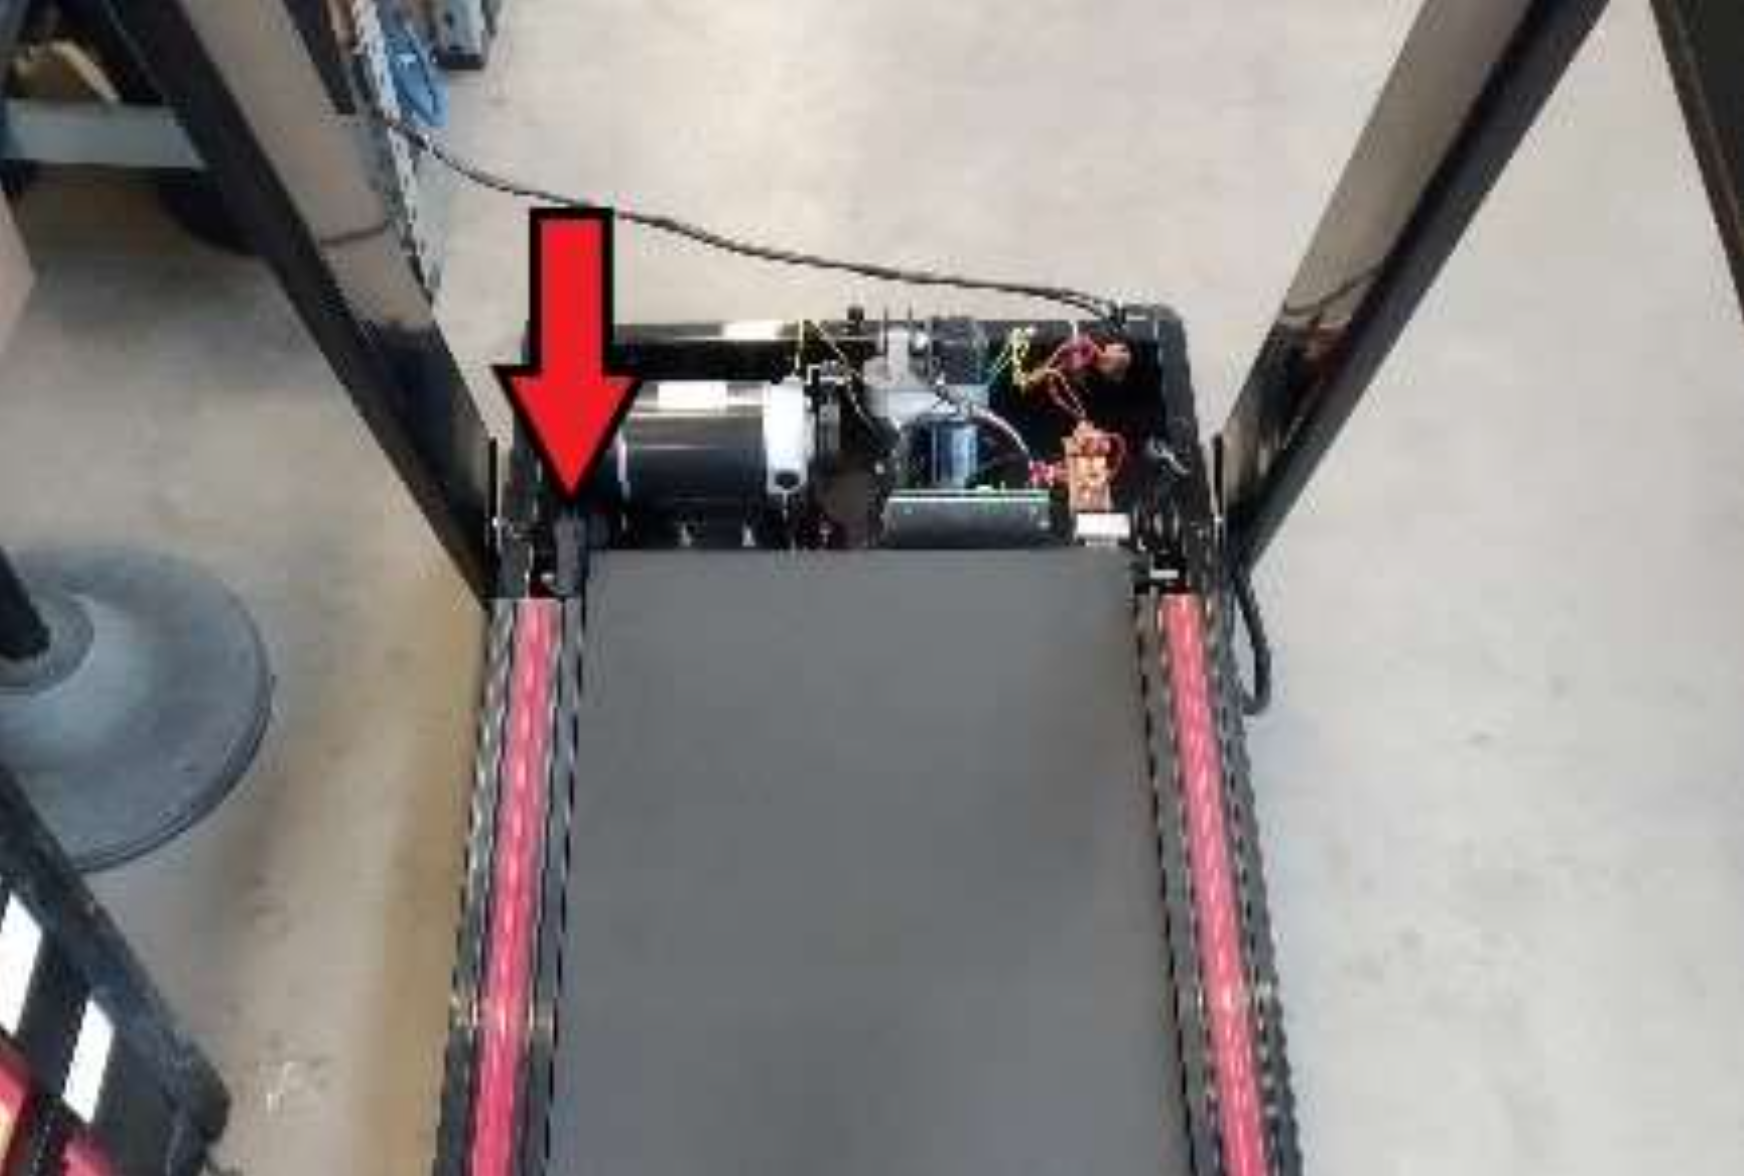
- At the front, note how far the screw on the right side is screwed in, or take a photo. Then unscrew the screws.
- First, pull the front roller out to the right and remove the belt from the pulley. Then take the new roller, put the belt on it, and insert the roller.
- Screw the screw back in to the same position it was in before removal.
- Turn the rear screws to retension the running belt.
- To check the running belt tension, lift the running belt on one side and slide your hand between the running belt and the running deck. Your hand should only reach the midpoint. If it reaches further than the midpoint, the running belt needs to be retensioned.
Related video guide on YouTube.
Replacing the rear roller
Related video guide on YouTube.
The spare parts list includes all individual parts used in the machine, from assembly through to use.
You can find all the important information in the manual.